Sunday
Monday
Tuesday
Wednesday
Thursday
Friday
Saturday
lattice chicken pot pie
Mexican street corn pasta
chicken Ghiveci
creamy chicken tortilla soup, jalapeno jack popovers
butter basted ribeyes, twice baked potatoes, broccoli
brisket tacos, pinto beans
pork souvlaki, naan

Wednesday, December 31, 2014

2014: A Year in Review

Another year is in the books!  C has returned home from Aspen for good and our little family is reunited in Houston.  Which means less bread baking and seafood dishes, but a lot more family dinners without having to use Skype.  This year we were lucky enough to visit the Big Island in Hawaii, Colorado Springs, Disneyland/Disney World, New Orleans, and Aspen for several ski trips.  We are headed back to Aspen for a couple visits in 2015 for more skiing adventures, I am looking forward to getting back to Colorado.  Wishing you all a wonderful new year!

These are the top twelve posts from this year based on the number of hits they received. I am very impressed that Carbonara made the list, twice!

Wishing you all an amazing 2015!
#1 Hoisin Pork with
Rice Noodles

#1 2014
#2 Rosemary Sriracha
Chicken Thighs

#2 2014
#3 Chicken Pot Pie with
Cream Cheese Biscuits

#3 2014
#4 Easy Crusty Bread
#4 2014
#5 Crockpot Loaded Baked Potato Soup
#5 2014
#6 Easiest Ever Carbonara
#6 2014
#7 Butternut Squash and
Spinach Carbonara

#7 2014
#8 Angel Hair Pasta with Shrimp
in a Lemon Cream Sauce

#8 2014
#9 Hot Pepper
Noodles

#9 2014
#10 Sriracha Lime Chicken Kebabs
#10 2014
#11 Braised Short Rib Pasta
#11 2014
#12 Mongolian Beef
#12 2014
Pin It Now!

Monday, December 29, 2014

Meyer Lemon Sweet Rolls

Meyer Lemon Sweet Rolls
This is a winter adaption for my most favorite easy overnight cinnamon rolls. My mom brought me a ton of meyer lemons, so meyer lemon sweet rolls were born. I am not usually a breakfast fan, unless I am eating dinner for breakfast, but I was happy to indulge in one of these sweet rolls in the morning.  Miss F loves lemons, she takes a lemon wedge in her school water bottle every day.  She wished that these were tarter, so I may make them again with regular lemons next time to appease her.  She said they were too sweet for her taste, what a fancy six year old!
Meyer Lemon Sweet Rolls

2/3 cup milk
3 tablespoons butter
1 ½ teaspoons yeast
1/3 cup white sugar
3 cups flour
¾ teaspoon salt
2 eggs

½ cup sugar
2 tablespoons butter, softened
2 tablespoons fresh meyer lemon juice

¾ cup confectioners' sugar
1 tablespoon fresh meyer lemon juice

Heat the milk in a small saucepan just until it begins to bubble, remove from the heat. Swirl in the butter until melted.

In the bowl of a stand mixer, dissolve the yeast in the milk mixture. Add the sugar, 2 cups of the flour, salt and eggs; stir well to combine. Add the remaining flour a ½ cup at a time, stirring well after each addition. Knead for 5 minutes using the dough hook of the stand mixer.

Lightly oil a large mixing bowl, place the dough in the bowl and turn to coat with oil. Cover with a damp cloth and let rise in a warm place until doubled in volume, about 1 hour. Deflate the dough and turn it out onto a lightly floured surface and roll into a 10x10 inch square. Lightly brush the far edge with water. In a small bowl combine the sugar, butter and lemon juice; sprinkle over the prepared dough. Roll up the dough into a log and seal the seam. Cut the dough into 8 equal pieces and place into a greased 9 inch cake pan. Cover with plastic wrap and place in the refrigerator to rise overnight.

Preheat the oven to 375 degrees, while the oven is heating, let the prepared rolls rise on the countertop. Bake the rolls for 25 to 30 minutes, until golden brown. While the rolls are baking, whisk together the confectioners' sugar and lemon juice. Drizzle the glaze over the baked rolls and serve warm.
Pin It Now!

Thursday, December 25, 2014

Merry Christmas

And happy holidays to all! Wishing you a joyous holiday season, from our family to yours. 
pic
Pin It Now!

Wednesday, December 24, 2014

Lemon Veal Scallopine

Lemon Veal Scallopine
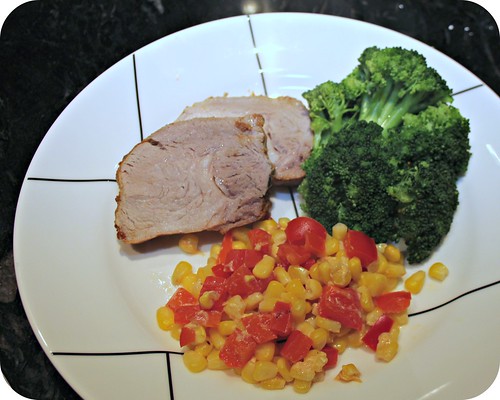
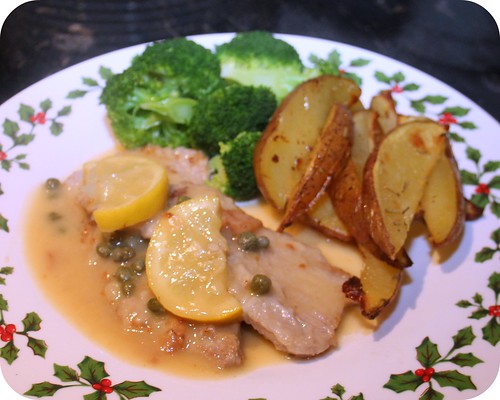
This dish could not get any easier. It came together in less than 10 minutes and it tasted like I had spent hours on it. I had a very hungry C and Miss F, so the speed of the meal was very much appreciated. Too bad my mom's rosemary roasted potatoes take a little longer to prepare than the veal. Miss F still mystifies me sometimes, she refused the potatoes, but gladly ate all her broccoli. And this was after having two helpings of broccoli for her school lunch.  I used lemons that my mom had brought me from her lemon tree, which is so nice to have.  Next time I make this, I will serve it over angel hair, which will truly make it a 20 minute meal from start to finish.  This recipe was inspired by Gourmet magazine.
Lemon Veal Scallopine

¼ cup flour
½ teaspoon salt
four 3-ounce veal scallops, each about 1/8 inch thick
1 tablespoon olive oil
½ cup dry white wine
½ cup chicken stock
three ¼ inch lemon slices, halved
1 teaspoon drained bottled capers
1 tablespoon unsalted butter, softened
1 tablespoon flour

In a shallow dish stir together the flour and the salt and in the flour mixture dredge the veal, 1 piece at a time, shaking off the excess. In a large non-stick skillet heat the oil over moderately high heat until it is hot but not smoking and in it sauté the veal for 1 minute, or until it is pale golden. Turn the veal and sauté it for 30 seconds more, or until it is pale golden and just springy to the touch. Transfer the veal to a platter and keep it warm, covered. Add to the skillet the wine, stock, lemon, and the capers and simmer the mixture for 1 minute. With a fork, mix together the butter and flour. Swirl the butter flour mixture into the sauce. Serve the veal topped with the sauce.
Pin It Now!

Monday, December 22, 2014

Crockpot Garlic Rosemary Beef Stew

Crockpot Rosemary Garlic Beef Stew
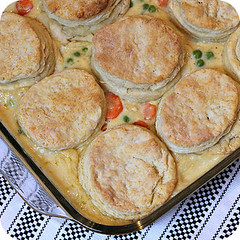
Stew is always a great winter dish, especially when I make it in the crockpot. Mondays are usually crazy because Miss F's dance class isn't over until nearly 5 pm, which means there isn't much time to get dinner on the table. This stew is fantastic, I made a few changes from the original, mainly the addition of peas. I love adding peas to stew.  The stew's sauce was so rich and had a great depth of flavor from the soy sauce and brown sugar.  Of course Miss F refused the potatoes, but she gobbled up the rest of the dish.  The original recipe can be found on Budget Bytes.
Crockpot Rosemary Garlic Beef Stew

6 carrots, peeled and sliced
½ onion, diced
1 pound new potatoes, chopped in 1" cubes
1 pound stew beef
¼ cup flour
2 tablespoons olive oil
3 cloves garlic, minced
½ cup red wine
2 cups beef broth
1 teaspoon Dijon mustard
1 tablespoon Worcestershire sauce
1 tablespoon soy sauce
1 teaspoon brown sugar
1 teaspoon dried rosemary
½ teaspoon dried thyme
2 cups frozen peas

Add the carrots, onions and potatoes into the bowl of the crockpot. Toss the stew beef with flour, season with salt and pepper. Heat the oil in a large skillet over medium heat. Saute the garlic for 30 seconds, then add the meat and flour mixture. Saute the meat about a minute a side until all sides are browned. Add the meat to the slow cooker, then deglaze the pan with the wine. Bring to a simmer and stir in the broth, mustard, Worcestershire, soy sauce, brown sugar, rosemary and thyme. Salt and pepper to taste. Pour the broth mixture into the crockpot and stir. Cover and cook on low for 8 hours, stir in the peas for the last 20 minutes of cooking.
Pin It Now!

Friday, December 19, 2014

Garlic Butter Dinner Rolls

Garlic Butter Dinner Rolls
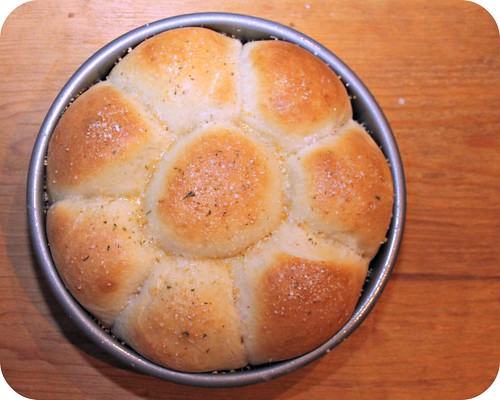
Mmmmm...warm, soft rolls topped with butter and garlic salt, there really isn't anything better. I adapted this recipe from Carlsbad Cravings. The original called for 28 rolls, which would have been lovely to have, but I am positive I would have eaten every last one. Seeing how I have been indulging more than usual for the holidays, 28 rolls lurking in my house wasn't a good idea for anyone. Miss F and C both loved these rolls, they are sweet and the salty topping is perfect. I may try them again with sea salt on top instead of the garlic salt, I bet that would be amazing. I have some pink sea salt that could be a really fun topping.
Garlic Butter Dinner Rolls

½ cup milk
3 tablespoons salted butter, cut into pieces
3 tablespoons sugar
¾ teaspoon yeast
3 tablespoons warm water
1 large egg, lightly beaten
½ teaspoons salt
2 ½ cups flour
1 tablespoon butter, melted
2 teaspoons garlic salt

Add the milk to a microwave safe two cup measure. Heat the milk in the microwave for one minute, swirl in the butter until melted and add the sugar. Put the two cup measure into the refrigerator. In the bowl of the stand mixer, add the water and yeast, let stand 5 minutes, until foamy. Add the milk mixture, egg and 2 cups of the flour, mix until well combined. With the mixer on low, add the remaining ½ cup of flour a little at a time. Knead on medium-low speed for 5 minutes, until dough is smooth and elastic. Shape the dough into a ball, coat with olive oil, return to the bowl and cover with plastic wrap. Allow to rise for 1 hour in a warm place. Punch down the dough and divide into 8 equal pieces, shape each into a ball. Place the balls in a greased 8 or 9 inch cake pan. Cover with a towel and let rise one hour more. Preheat the oven to 350 degrees. Brush the rolls with half of the melted butter. Bake for 20 minutes, until golden brown. Brush with the remaining butter and sprinkle with the garlic salt.
Pin It Now!

Wednesday, December 17, 2014

Lemon Sour Cream Doughnuts

Lemon Sour Cream Doughnuts
Miss F begged to make doughnuts while C was up skiing in Whistler. I had planned to make chocolate sour cream doughnuts, but she had a different plan. She was dead set on having lemon doughnuts. Thankfully, it is the time of year when lemons (and Meyer lemons) are aplenty. She ate three doughnuts before I could even realize what was going on, then she downed a bowl of raspberries and was wanting another doughnut. I relented and I didn't think she would be hungry for the remainder of the day. I was wrong, so we must be mid growth spurt. Thanks to Divas Can Cook for the recipe.
Lemon Sour Cream Doughnuts
makes 12 doughnuts

1 cup flour
1 teaspoon baking powder
¼ teaspoon baking soda
¾ cup white granulated sugar
juice from one large lemon
1 egg, beaten
2 tablespoons butter, melted
½ cup sour cream
¼ cup milk
few drops yellow food coloring (optional)

Preheat the oven to 350 degrees. Grease a doughnut pan with cooking spray, set aside. Whisk together the flour, baking powder, baking soda and sugar in a large bowl. In a two cup measure, whisk together the lemon juice, egg, butter, sour cream and milk. Stir the wet ingredients into the dry ingredients until combined, then stir in the food coloring. Fill the doughnut pan with the batter and bake for 8 to 10 minutes. Allow to cool in the pan for two minutes, then turn out onto a wire rack and cool completely.
Pin It Now!

Monday, December 15, 2014

Chicken Spaghetti in a Creamy Parmesan and Sundried Tomato Sauce

Chicken Spaghetti in a Creamy Parmesan and Sundried Tomato Sauce
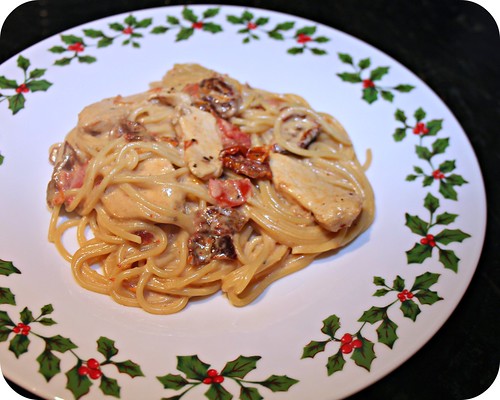
This recipe ended up quite differently than the original from Closet Cooking.  I knew I wanted to add pasta to absorb all the delicious sauce and I had fresh tomatoes from my mom's garden that needed to be used.  Everyone loved this dish!  Miss F was wary of the sun-dried tomatoes, but she was fine eating the other tomatoes.  Her main obsession was the pasta, she kept asking for more.  Her pediatrician said it looks like she is getting ready for a growth spurt, we had her annual check-up and was shocked to realize that we hadn't seen the doctor since our visit last year.  I feel so lucky to have such a healthy kid.
Chicken Spaghetti in a Creamy Parmesan and Sundried Tomato Sauce

12 ounces spaghetti
1 tablespoon olive oil
2 boneless skinless chicken breasts, thinly sliced
2 cloves garlic, chopped
¼ teaspoon red pepper flakes
¼ cup dry white wine
½ cup chicken broth
½ cup cream
1 tomato, seeded and chopped
¼ cup sundried tomatoes, chopped
½ cup grated parmesan
¼ cup fresh basil, thinly sliced (or 1 teaspoon dried basil)
salt and pepper to taste

Prepare the spaghetti per package instructions, drain and set aside. In a large skillet, heat the oil over medium-high heat. Add the chicken, cooking until golden brown, about 5 minutes. Add the garlic and red pepper flakes, saute for 30 seconds. Add the wine to deglaze the pan. Stir in the broth, cream, tomatoes and sun-dried tomatoes, bring to a boil and reduce to a simmer. Simmer for 5 minutes, stir in the parmesan cheese, basil, salt and pepper. Toss the spaghetti with the sauce; serve.
Pin It Now!

Friday, December 12, 2014

Soft Yeast Rolls

Soft Yeast Rolls
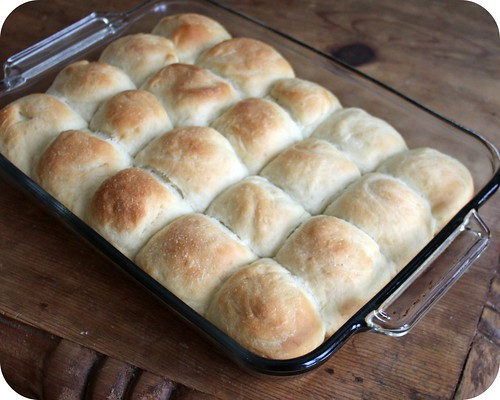
I love making homemade rolls for the holidays. C much prefers the pop-n-serve rolls that you get at the grocery store and warm in their little cardboard tray. C loved these rolls and I think my mom thought they actually were of the pop-n-serve variety. I like baking them the day before and then just wrapping them in foil to warm in the oven when they are ready to be served. I generally have too much going on during a holiday dinner to keep track of rising times and such. Thanks to Sunny Side Up for the amazing recipe, my whole family loved them. There may have been a minor battle over the leftover rolls at the end of the evening.
Soft Yeast Rolls

¼ cup warm water (110° to 115°)
1 cup warm milk (110° to 115°)
2 ¼ teaspoons yeast
3 tablespoons unsalted butter, softened
1 egg
2 tablespoons sugar
¾ teaspoon salt
3 ½ cups flour
1 tablespoon butter, melted

Warm the water and milk in a two cup measure, sprinkle the yeast overtop and let stand for a couple minutes. Add to the bowl of a stand mixer, along with the butter, egg, sugar and salt. Mix on low to combine. Add 1 ½ cups of flour and beat until smooth. Replace the paddle with a dough hook and add 2 more cups of flour. Knead for 5 minutes, until the dough is smooth and elastic. Cover and let rise for 1 hour. Grease a 9x13 glass baking dish. Punch down the dough and knead by hand on a well floured surface for a minute or so. Divide the dough into 20 equal pieces and place in the baking dish, 4x5. Brush the rolls with the melted butter. Cover and let rise for 30 minutes more. Preheat the oven to 350 degrees. Bake the rolls for 25 to 30 minutes, until golden brown.
Pin It Now!

Wednesday, December 10, 2014

Triple Chocolate Chip Cookies

Triple Chocolate Chip Cookies
Every year my friend Brandi hosts an amazing cookie exchange. We are all asked to bring six dozen cookies, packaged in bags of three cookies each and the swapping is coordinated by our host. We just drink, eat, talk, eat and drink some more. It is always a lovely time and each year I always aim to make a new recipe. I knew I wanted a recipe for chocolate chips cookies that produced six dozen cookies. These cookies bake up beautifully. I really loved the way they turned out. This is year number five of the exchange, I have only missed one year. I have made chocolate cayenne cookies, ultimate Reeses Pieces cookies and peanut butter chocolate chip cookies in the past. This recipe was adapted from food.com.
Triple Chocolate Chip Cookies

1 ¼ cups sugar
1 ¼ cups firmly packed brown sugar
1 ¼ cups butter, melted
2 teaspoons vanilla
3 eggs
4 ¼ cups all-purpose flour
2 teaspoons baking soda
1 teaspoon salt
1 cup semi-sweet chocolate chips
1 cup milk chocolate chips
1 cup white chocolate chips

Preheat the oven to 375 degrees. In the bowl of the stand mixer, beat together the sugar, brown sugar and butter. Add the vanilla and eggs, beat until well combined. Stir in the flour, baking soda and salt until combined. Fold in the three chocolate chips. Drop the dough by rounded tablespoons onto Silpat or parchment lined baking sheets. Bake for 8 to 10 minutes, until golden brown. Cool in the pan for 5 minutes, then remove to wire racks to cool completely.
Pin It Now!

Monday, December 8, 2014

Skillet Chicken Souvlaki

Skillet Chicken Souvlaki
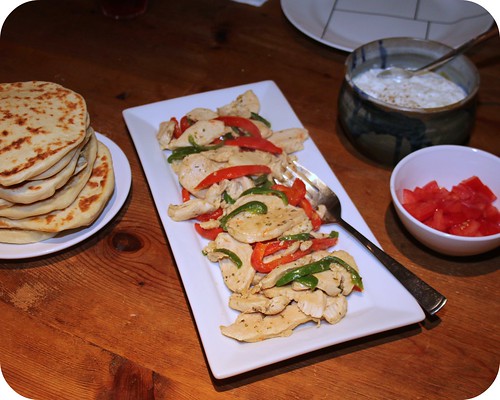
I heavily adapted this recipe from Cooking Light, mainly in that I served it on naan instead of pita. I always prefer naan to pita, as long as it is homemade. My parents' garden has provided lots of bell peppers, tomatoes and cucumbers this fall, which fits perfectly into this meal.  The red bell pepper was from Kroger and the green bell pepper was from the garden.  The size difference between the two was spectacular, the garden bell pepper was about a quarter of the size of the grocery store bell pepper.  I wonder what they are doing to those peppers.  Everyone loved this meal and it also provided great leftovers.  I may have had a couple naan slathered in the cucumber yogurt sauce, it is one of my most favorite foods.
Skillet Chicken Souvlaki

1 cucumber, peeled, seeded and grated
1 clove garlic, minced
1 cup plain Greek yogurt
½ lemon, juiced
½ teaspoon salt
¼ teaspoon fresh cracked pepper

1 tablespoon olive oil
1 clove garlic, minced
½ teaspoon oregano
2 boneless skinless chicken breasts, sliced
1 bell pepper, any color, seeded and sliced

1 tomato, chopped
1 recipe naan or pita

Stir together the cucumber, garlic, yogurt, lemon juice, salt and pepper in a small bowl. Set aside.

Heat the olive oil in a large skillet over medium high heat. Add the garlic and oregano, saute for 30 seconds. Add the chicken and bell pepper, saute for 5 to 7 minutes, until the chicken is cooked through. Serve the chicken on naan or pita, topped with the tomato and yogurt sauce.
Pin It Now!

Friday, December 5, 2014

Chicken Madeira

Chicken Madeira
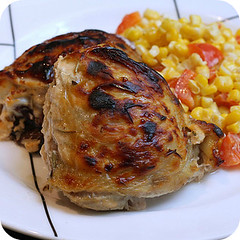
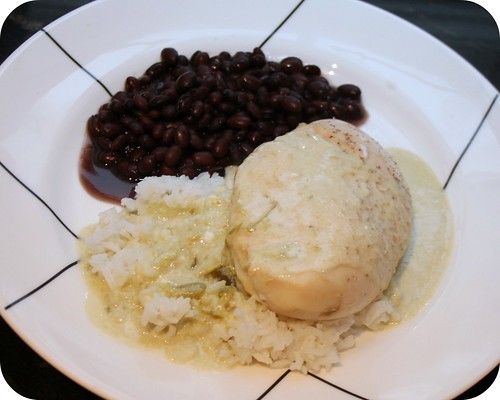
I love Madeira wine, especially with veal.  Unfortunately, the rest of my family has differing opinions.  Miss F had her chicken plain, no potatoes and lots of broccoli (no stems!)  C had the sauce on the side and made a meager effort to eat a couple of the mushrooms.  I had mine drenched in the delicious sauce, I may have stolen a couple of C's mushrooms, which he was grateful for.  The sauce was also amazing on the mashed potatoes, so I highly recommend serving them with this dish.  Thanks to Life as a Mrs. for the great recipe.
Chicken Madeira

1 tablespoon vegetable oil
1 tablespoon butter
1 pound boneless skinless chicken breasts, cut into 4 cutlets
¼ cup flour
4 slices Mozzarella cheese

1 tablespoon butter
8 ounces mushrooms, sliced
2 cloves garlic, minced
2 tablespoons flour
1 cups Madeira wine
½ cup chicken broth
½ teaspoon salt
Cracked black pepper to taste

Preheat the oven to 350. Spray a baking sheet with non-stick cooking spray and set aside. Heat the oil and butter in a large skillet. Dredge the chicken in flour, shake off any excess. Add the chicken to the pan and sauté until golden brown, about 2 to 3 minutes a side. Remove to the prepared baking sheet and place in the preheated oven for 10 minutes. Top each chicken cutlet with mozzarella cheese and return to the oven for 1 to 2 minutes more.

While the chicken is in the oven, add another tablespoon of butter to the pan that the chicken was cooked in. Add the mushrooms and sauté for 2 to 3 minutes. Add the garlic and cook for 30 seconds. Add the flour and stir until incorporated, for about 30 seconds more. Deglaze the pan with the wine and chicken broth, stirring well. Bring to a boil and cook until the mixture reduces and thickens, add the salt and pepper. Serve the chicken topped with the madeira sauce.
Pin It Now!

Wednesday, December 3, 2014

Chipotle Pork

Chipotle Pork
I always keep a container of chipotles in adobo sauce in our freezer. That way, I can grab one or two as needed instead of wasting an entire can for just a couple peppers. This recipe is amazingly easy and full of smoky chipotle flavor.  I remember the first time I ever cooked with chipotles, I was pleasantly surprised with the level of heat they provided.  I made corn blinis for a dinner party and I failed to warn my guests about the spice level, whoops!  Thanks to The Way To His Heart for the amazing recipe.
Chipotle Pork

½ cup chopped onion
1 ½ tablespoons honey
1 teaspoon ground cumin
9 large garlic cloves, peeled
3 chipotle chiles, canned in adobo sauce
1 lime, juiced
2 tablespoons olive oil, divided
1 two pound boneless pork loin
1 teaspoon salt
½ cup chicken broth

Add the onion, honey, cumin, garlic, and lime juice to the bowl of a food processor. Pulse until finely chopped. Add one tablespoon of the oil and process until smooth. Add the pork and the chipotle mixture to a resealable plastic back. Marinate at room temperature for 30 minutes.

While the pork is marinating, preheat the oven to 325 degrees. Heat the remaining olive oil in a pot with a lid over medium high heat. Remove the pork from the bag, reserving the marinade. Sprinkle the salt over the pork and sear in the oil on all sides, for about 8 minutes. Remove the pork and set aside. Add the broth and the marinade to the pot, bring to a boil and scrape the browned bits from the bottom of the pan. Return the pork to the pan, cover and bake for 1 to 1 ½ hours, until the internal temperature reaches 160 degrees. Remove from the oven and let rest for 10 minutes. Slice and spoon the sauce over top.
Pin It Now!

Monday, December 1, 2014

Creamy Cajun Chicken Pasta

Creamy Cajun Pasta
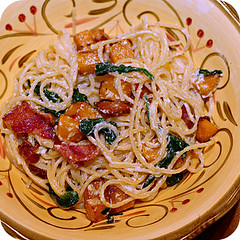
I have way too many recipes for Cajun pasta (chicken, shrimp, shrimp again, chicken again, pork, chicken alfredo and chicken once more) on my blog. Well, I guess that depends on how you look at it. I love this dish in any form and when I saw this version from food.com on Pinterest, I wanted to try it. I love sun-dried tomatoes and I knew they would be a fantastic addition to this dish.  I made a lot of changes from the original, but everyone loved this dish.  The sun-dried tomatoes were just as perfect as I thought they would be, in fact, I know I may try them in carbonara next.  I use the dried tomatoes that you re-hydrate with hot water instead of the ones packed in oil.
Creamy Cajun Pasta

12 ounces linguine
2 boneless skinless chicken breast halves, cut into thin strips
2 teaspoons Cajun seasoning (I use Tony Chacheres)
2 tablespoons flour
2 tablespoons butter
1 red bell pepper, seeded and sliced
1 green bell pepper, seeded and sliced
1 clove garlic, minced
¼ cup white wine
¾ cup cream
2 tablespoons chopped sun-dried tomatoes
½ teaspoon salt
½ teaspoon dried basil
1/8 teaspoon ground black pepper
½ cup grated parmesan cheese

Prepare the linguine per package instructions, drain and set aside. Toss the chicken with the cajun seasoning and flour. Heat the butter in a large skillet over medium heat, saute the chicken and bell pepper for 5 to 7 minutes, until chicken is cooked through. Add the garlic and cook for 30 seconds more. Add the wine to deglaze the pan, scraping up any brown bits on the bottom. Bring to a simmer. Add the cream, tomatoes, basil, salt and pepper, stir and heat through. Stir in the parmesan and linguine, toss to coat and serve.
Pin It Now!

Monday, November 24, 2014

Cheddar Hamburger Buns

Cheddar Hamburger Buns
So this time next week you should have tons of leftover turkey. And these buns would be perfect for leftover turkey sandwiches, you don't even need to add cheese. Of course C and Miss F feel the need to add cheese to everything, mostly two slices if allowed. I actually served leftover chipotle pork on these rolls with barbecue sauce and the next day I had them as crabcake sandwiches with my mom's famous crabcake sauce. They worked great for both meals and I plan to be whipping up another batch for Thanksgiving leftovers. Miss F adored these rolls! Thanks to Confections of a Foodie Bride for the amazing recipe.
Cheddar Hamburger Buns

2 ¼ teaspoons yeast
1 cup lukewarm water
2 tablespoons vegetable oil
2 eggs
3 tablespoons sugar
3 ¼ cups flour
1 teaspoon salt
6 ounces sharp cheddar, shredded

Add warm water to the bowl of the stand mixer and sprinkle the yeast over top. Let sit for 5 minutes, until frothy. Add the, oil, 1 egg, and sugar to the bowl. Add the flour, salt, and cheese and mix on medium-low speed with the hook until the dough holds together, about 2 minutes. The dough should clean the sides of the bowl. If not, add additional flour by the tablespoon. Increase speed to medium and knead the dough for 5 minutes. Transfer the dough to a large bowl that has been lightly greased with oil. Cover it with a damp towel and let rise in a warm place until doubled in bulk, 1 to 1 ½ hours. Line a baking sheet with parchment paper or a Silpat. Turn out the dough onto a lightly floured surface. Divide the dough in half, divide each halve in half and then divide the quarters in half again, you will have 8 buns. Roll into rounds and flatten with the palm of your hand onto the baking sheet; placing buns about 1 inch apart. Cover with a damp towel and let them rise for 20 minutes + oven preheating time. Preheat oven to 350 degrees. Whisk the remaining egg with 1 tablespoon water. Brush the buns with the egg wash and bake for 20 to 30 minutes, until golden brown. Let cool 10 minutes before slicing and serving. Store leftovers in a zip-top bag at room temperature.
Pin It Now!

Friday, November 21, 2014

Salsa Verde Chicken Tacos

Salsa Verde Chicken Tacos
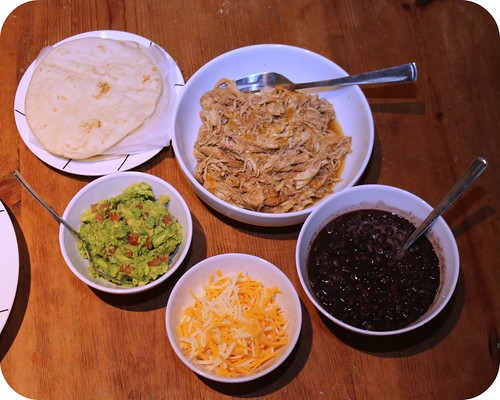
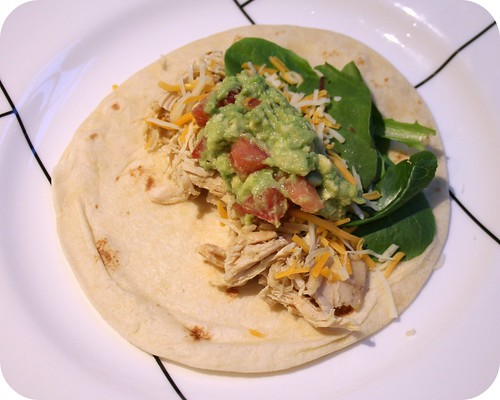
I had a jar of salsa verde in the refrigerator that needed to be used. And I always love my go to, crockpot chicken soft tacos, but I wanted to make something different and ditch the seasoning packet for good. I swapped out the Rotel for salsa verde, fresh jalapeno and onion, with some lime juice added.  It couldn't be easier and I really want to try the original recipe without the seasoning packet.  Miss F has been quite a fan of making her own tacos lately.  A little chicken, a little guacamole, tons of beans and even more cheese.  It is quite a mess.
Salsa Verde Chicken Tacos

2 tablespoons olive oil
1 pound boneless skinless chicken breasts
½ small onion, chopped
½ jalapeno, seeded and chopped
juice from ½ lime
½ cup salsa verde
½ cup chicken broth
½ teaspoon cumin
½ teaspoon salt

12 tortillas, warmed
guacamole
sour cream
shredded lettuce
shredded cheese

Pour the olive oil into the crockpot. Add the chicken, onion and jalapeno. In a two cup measure, stir together the lime juice, salsa, broth, cumin and salt. Pour over the chicken, cover and cook on low for 6 to 8 hours. Remove the chicken from the crockpot and shred with two forks, return the chicken to the crockpot and increase the heat to high. Cook for an additional 20 minutes. Serve the chicken on warmed tortillas topped with guacamole, sour cream, lettuce and shredded cheese.
Pin It Now!

Wednesday, November 19, 2014

Rustic Pear Tart

Rustic Pear Tart
I had four pears sitting on my counter due to a coupon and a great sale. I knew I wasn't going to be able to eat them all before they got overripe, so the Rustic Pear Tart was born. I used Martha Stewart's recipe for the pastry dough, it is my go to and never lets me down. The key is overflouring your board when you roll out the dough, it really makes it easier to work with. A tip for peeling the pears is to blanche them for 15 seconds or so, the skin peels right off after. I learned this trick when I made Miss F's baby food and it works great on other fruits too, like peaches, plums and nectarines. This tart came together very quickly, within an hour and a half we were eating warm pear tart with vanilla ice cream. I may make one with apples for Thanksgiving, since it was so easy.
Rustic Pear Tart

1 ¼ cups flour
1 teaspoon sugar
½ teaspoon salt
½ cup butter
2 to 4 tablespoons ice water

4 pears, peeled, cored and sliced
juice from one lemon
¼ cup sugar
½ teaspoon cinnamon
pinch nutmeg
1 tablespoon cream
1 teaspoon sugar

Add the flour, sugar and salt to the bowl of the food processor. Process for 15 seconds. Cut the butter into small cubes and add to the flour mixture. Pulse for 30 seconds, until the mixture is pea sized crumbles form. Stream the water through the feed tube and add until the dough comes together. Transfer to a plastic bag and refrigerate for an hour.

Toss the pear slices with the lemon juice, sugar, cinnamon and nutmeg. Stir to coat.

Preheat the oven to 400 degrees. Roll out the pastry dough into a 10" circle and transfer to a Silpat lined baking sheet. Pour the pear mixture into the center of the dough round and carefully turn the edges up over the pear mixture, working around in a circle until all edges are folded over the pears. Brush the folded over edges with cream, then sprinkle with the teaspoon of sugar. Bake for 25 to 30 minutes. Serve warm with vanilla ice cream.
Pin It Now!

Monday, November 17, 2014

Crockpot TexMex Chicken Stew

Crockpot TexMex Chicken Stew
This dish reminded me of our family favorite, Crockpot Chicken Enchilda Soup. Miss F was a huge fan of this, but didn't like it served over the rice, she preferred hers straight.  This is a perfect winter meal, throw everything in the crockpot in the morning and prep the rice after you shred the chicken, dinner is served.  This will definitely go into my recipe box for the days when Miss F's after school activities keep us out late.  It is so nice to come home to a house that smells great and dinner is ready.  Thanks to Pink Parsley for the inspiration.
Crockpot TexMex Chicken Stew

½ yellow onion, minced
1 green bell pepper, seeds and ribs removed, chopped
2 cups frozen corn
1 (15-oz) can black beans, drained and rinsed
1 jalapeno, seeds and ribs removed, minced
3 garlic cloves, minced
2 cups chicken broth
1 (14.5 oz) can Rotel, diced tomatoes with chiles
2 tablespoons corn starch
1 tablespoons brown sugar
1 tablespoon tomato paste
2 teaspoons chile powder
1 ½ teaspoons ground cumin
1 ½ pounds boneless, skinless chicken thighs, trimmed of excess fat
1 minced chipotle chile in adobo sauce
¼ cup minced fresh cilantro
2 cups white rice

Add the onion, bell pepper, corn, beans, jalapeno and garlic to the crockpot. Whisk together the broth, Rotel, corn starch, sugar, tomato paste, chile powder and cumin. Pour the broth mixture into the crockpot, stir to combine. Season the chicken with salt and pepper and nestle the chicken thighs to the crockpot . Cover and cook on low for 4 to 6 hours.

Remove the chicken from the crockpot and shred with two forks. Return the chicken to the crockpot and stir in the chipotle. Cover and cook on high for 10 minutes more. Prepare the rice per package instructions. Serve the rice with the chicken spooned over top, top with cilantro.
Pin It Now!

Friday, November 14, 2014

Balsamic Pear Salad

Balsamic Pear Salad
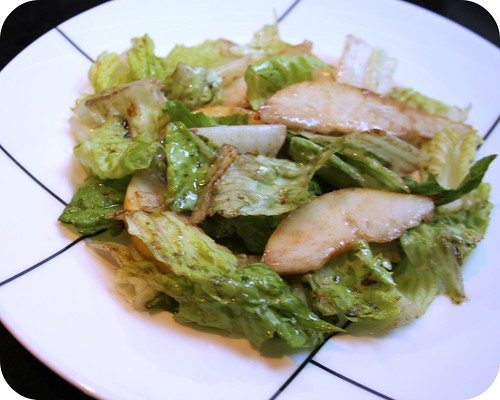
Miss F has been eating salad more often, which means I have been eating salad more often. There were gorgeous pears at the grocer this week and this salad was the perfect way to showcase them. I was shocked when C devoured the whole thing, I never figured him to be a pear-salad loving guy. Sweet balsamic dressing is one of my most favorite salad toppings and it works beautifully with fall pears.  I used Anjou pears, but Bosc pears would work just as nicely.
Balsamic Pear Salad

3 tablespoons balsamic vinegar
1 tablespoon Dijon mustard
1 tablespoon brown sugar
½ cup olive oil
4 cups chopped romaine
1 pear, sliced
¼ onion, thinly sliced

Whisk together the vinegar, mustard and sugar. Stream in the olive oil, whisking constantly. Toss the romaine, pears and onion with the dressing. Serve.
Pin It Now!

Wednesday, November 12, 2014

Seared Salmon Salad with Avocado Vinaigrette

Seared Salmon Salad with Avocado Vinaigrette
All salads need avocado in them. I could probably eat any combination of vegetables and with lettuce as long as there were chunks of avocado nestled somewhere in the greens. I first discovered avocado vinaigrette in a recipe swap I participated in. This salad is simple and delicious, perfect for night's when C is out and it is just Miss F and myself. She will eat salad, but only with ranch dressing. She is okay with salmon, but it isn't her most favorite fish. Her favorite fish is fish sticks, go figure. I tried one the other day, I hadn't had one since I was a kid. They were pretty much breaded bread, not an ounce of fish inside.
Seared Salmon Salad with Avocado Vinaigrette

1 avocado
½ teaspoon sugar
¼ teaspoon salt
1 tablespoon freshly squeezed lime juice
1 tablespoon water
2 teaspoons rice wine vinegar
3 tablespoons olive oil

½ pound salmon, portioned into 2 filets
2 tablespoons olive oil
salt and pepper

4 cups mixed greens

Peel, seed, and dice avocado and place half of it in blender or food processor. Add sugar, salt, lime juice, water, and vinegar. With the machine running, slowly drizzle in oil until a creamy emulsion forms.

Rub the salmon filets with the oil and generously season with salt and pepper. Heat a skillet over medium high heat, add the salmon to the pan skin side down and sauté for 3 to 5 minutes. Flip the salmon over and sauté for 3 to 5 minutes more, until the salmon is cooked through.

Toss the mixed greens and remaining diced avocado with the vinaigrette. Divide among two plates and top each with the cooked salmon filet. Serve.
Pin It Now!

Monday, November 10, 2014

Baked Tequila Lime Chicken Fajitas

Baked Tequila Lime Chicken Fajitas
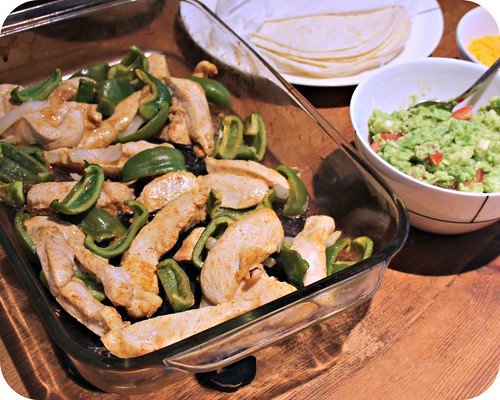
This recipe was inspired from Confections of a Foodie Bride, but sadly, I do not have a grill, so I had to adapt the recipe a bit. I am a big fan of baking fajitas because it makes things so very easy. While the fajitas are baking, you can warm the tortillas, prepare the guacamole and try to keep Miss F from eating all of the shredded cheese before dinner is served. The marinade is great, how could it not be? Tequila and lime juice is pretty much perfection.  Margarita fajitas!
Baked Tequila Lime Chicken Fajitas

Juice of 2 limes
2 tablespoons tequila
1 teaspoon chile powder
1 clove garlic, sliced
2 tablespoons olive oil
Pinch of salt
1 pound chicken breasts
2 bell peppers, sliced
1 onion, sliced
12 tortillas
grated Colby Jack cheese
guacamole
sour cream

Whisk together the lime juice, tequila, chile powder, garlic, olive oil and salt. Add the chicken breasts to a large resealable plastic bag and pour the marinade overtop. Allow to marinate for an hour or more.

Preheat the oven to 400 degrees. Slice the marinated chicken breasts into strips and add to a 9x13 baking dish. Add the bell pepper and onions to the dish, pour the marinade over top and toss to coat. Bake for 20 to 25 minutes. Serve in warm tortillas topped with cheese, guacamole and sour cream.
Pin It Now!

Friday, November 7, 2014

Baked Pumpkin Iced Doughnuts

Baked Pumpkin Iced Doughnuts
Miss F loves doughnuts for breakfast, they are about her most favorite breakfast treat. Though, she really loves all breakfast foods, which is the exact opposite of me. I don't really love many traditional breakfast foods, but I do adore doughnuts. These doughnuts are perfect for fall and Miss F approved.  This recipe makes six doughnuts using the Wilton doughnut pan.  Seriously, it has been one of my best kitchen investments ever.  And by investment, I mean it costs less than a dozen doughnuts. Thanks to the Redhead Baker for the inspiration!
Baked Pumpkin Iced Doughnuts

1 cup flour
1/3 cup sugar
1 tablespoon butter, melted
1 teaspoon baking powder
1 teaspoon ground cinnamon
¼ teaspoon nutmeg
pinch ginger
pinch cloves
½ teaspoons salt
1/3 cup canned pumpkin
1 egg
1 teaspoon vanilla extract

For the glaze:
1 tablespoon milk
½ cup confectioners’ sugar

Preheat oven to 400 degrees. Spray the doughnut pan with non-stick cooking spray. Stir together the flour, sugar, butter, baking powder, cinnamon, nutmeg, ginger, cloves, salt, pumpkin, egg and vanilla in a mixing bowl. The dough will be quite thick. Spoon the batter into the doughnut pan, making sure it is evenly distributed. Bake for 10 to 12 minutes, until the doughnut springs back to the touch. Cool on a wire rack. While the doughnuts are cooling, whisk together the milk and confectioners' sugar. Dip each cooled doughnut into the glaze and allow the glaze to set. Serve.
Pin It Now!

Wednesday, November 5, 2014

American Sandwich Bread

American Sandwich Bread
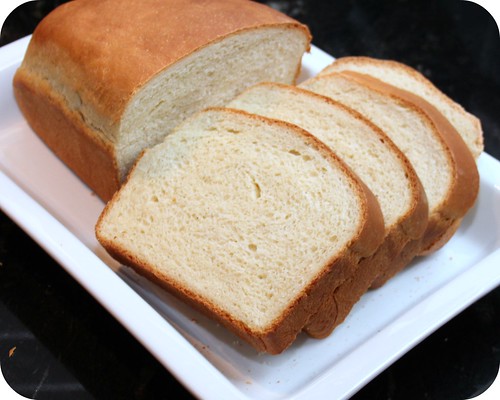
I decided to double the recipe from Confections of a Foodie Bride so I could have a loaf for us and a loaf for my parents.  The kneading portion was interesting, it climbed up the dough hook and nearly overtook my KitchenAid.  One loaf at a time in the future, that is for sure.  This bread is perfection.  It is great for sandwiches, with a drizzle of honey or even on its own (with butter, of course.)   Miss F was a huge fan of this bread for her lunchbox.  I will fully admit that I nearly ate the entire loaf.  Miss F had a sandwich or two, but the rest was all mine.  No regrets.
American Sandwich Bread

1/3 cup warm water
2 ¼ teaspoons dry active yeast
1 cup warm milk
3 tablespoons sugar
2 tablespoons butter, melted (I microwave it with the milk)
2 teaspoons salt
3 ½ cups flour
Oil or cooking spray for greasing bowl and loaf pan

Add the water to the bowl of the stand mixer, sprinkle the yeast overtop and proof for 5 to 7 minutes, until frothy. Add the milk, sugar, butter, salt and flour, mix at low speed until combined. Swap out the mixer attachment for the dough hook and need for 8 minutes more. Transfer to a lightly oiled bowl and allow to rise in a warm place for 45 minutes. Grease the loaf pan with cooking spray. Press the dough into a 1" thick rectangle approximately 9" long, then roll into a cylinder. Crimp the bottom edge of the dough and lightly press it into the pan. Allow to rise for 30 minutes more. Preheat the oven to 350 degrees. Bake for 45 minutes, until golden brown. Let cool in the pan for 5 minutes, then turn out onto a rack to cool completely.
Pin It Now!

Monday, November 3, 2014

Candy Corn Cookies

Candy Corn Cookies
I hope everyone had a wonderful Halloween with lots of treats, no treats. Miss F and I made a cake version of the candy corn cupcakes for her school carnival's cake walk. We had about a half of bag of candy corn left over, so I went searching for a cookie recipe to use up the remainder.  Miss F loved these cookies, they were perfect for the leftover candy corn.  Be sure to line the cookie sheets since the candy corn melts and can be a bit sticky.  Thanks to Averie Cooks for the fantastic recipe.  Our house is now candy corn free, but we have a plastic pumpkin full of candy from trick or treating.  Luckily, Miss F's school is collecting excess candy to donate to the Ronald McDonald house.
Candy Corn Cookies

½ cup butter, softened
¾ cup light brown sugar, packed
¼ cup sugar
1 egg
1 tablespoon vanilla extract
2 tablespoons cream
2 cups flour
2 teaspoons corn starch
1 teaspoon baking soda
pinch salt, optional and to taste
1 ½ cups candy corn (10 to 11 ounces)
1 cup white chocolate chips

Cream together the butter, sugars, egg and vanilla on medium-high speed until light and fluffy, about five minutes. Add the cream, flour, corn starch, baking soda and soda. Mix on low speed for one minute more. Stir in the candy corn and white chocolate chips. Use a 2" cookie scoop, form two tablespoon mounds on a plate. Refrigerate the cookie dough mounds for at least three hours.

Preheat the oven to 350 degrees. Line a baking sheet with a Silpat or parchment paper, place the refrigerated mounds 2" apart on the sheet, making sure the candy corn is not touching the cookie sheet. Bake for 9 minutes, until edges have set. Cool the cookies on the baking sheet for 5 minutes, then transfer to a wire rack to cool completely.
Pin It Now!

Friday, October 31, 2014

Butternut Bisque

Butternut Bisque
I am obsessed with butternut squash soups. I love them completely. I have come along way from my original recipe. I also love it with apples, in a chowder or even in stew.  This soup is perfection and quite easy to make, except for peeling the butternut squash. For some reason, I get some sort of reaction on my skin whenever I touch butternut squash raw. Thankfully eating it doesn't cause any issues at all!  C and Miss F weren't as big of fans.  Miss F was okay with it, as long as she could dip her crouton in it.  C whined about the thyme flavor, oh well, more soup for me.
Butternut Bisque

3 tablespoons butter
1 medium onion, coarsely chopped
2 garlic cloves, sliced
½ teaspoon dried thyme
¼ teaspoon cayenne pepper
Coarse salt
1 large butternut squash (about 4 pounds), peeled, seeded, and cut into 1-inch cubes
2 cups chicken broth
3 cups water
1 cup half-and-half
1 tablespoon fresh lemon juice

In a large sauce pan, melt the butter over medium heat. Add the onion, garlic, thyme and cayenne; season with salt. Cook, stirring occasionally, for 5 to 7 minutes, until the onion is soft. Add the squash, broth and water. Bring to a boil, reduce to a simmer. Simmer for 20 minutes, until squash is tender. Using a stick blender, puree the soup until smooth. Stir in the half-and-half and lemon juice, season with salt and pepper. Serve.
Pin It Now!

Wednesday, October 29, 2014

Apple Cider Doughnuts

Apple Cider Doughnuts
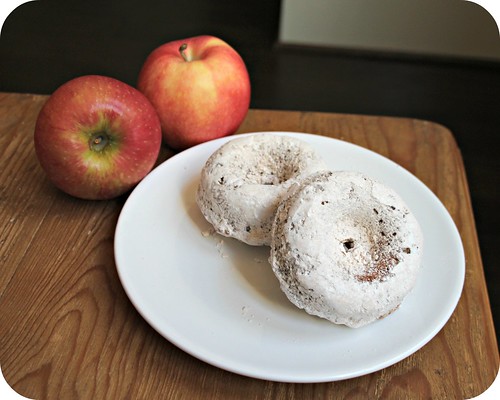
Miss F could have doughnuts for breakfast every single day. Or Cheerios. She loves both equally. My mom had given me a jug of apple cider and Miss F was content to drink every last drop of it, but I was able to snag enough from her to make these amazing doughnuts. The powdered sugar makes quite a mess, but it is worth it. These have a great fall flavor and are a perfect was to use apple cider.  Thanks to Hezzi-D Books and Cooks for the fantastic recipe.
Apple Cider Doughnuts

1 cup apple cider
1 ¾ cup flour
¾ teaspoon baking powder
½ teaspoon baking soda
½ teaspoon cinnamon
¼ teaspoon nutmeg
½ teaspoon salt
2 tablespoons butter, melted
½ cup sugar
1 large egg
¼ cup milk

¼ cup powdered sugar
1 teaspoon cinnamon

In a small saucepan over medium heat, bring the apple cider to a simmer. Reduce heat to low and simmer uncovered for 15-20 minutes or until the cider has reduced to 1/3 cup. Set aside to cool.

Preheat the oven to 400 degrees. Spray a doughnut pan with cooking spray and set aside. In a medium mixing bowl combine the flour, baking powder, baking soda, cinnamon, nutmeg, and salt. Stir in the butter, sugar, egg and milk. Mix until just combined. Fill the doughnut pan 2/3 of the way full and bake for 8 to 11 minutes, until the doughnuts are golden brown. Cool doughnuts on a wire rack.

In a shallow bowl, stir together the powdered sugar and cinnamon. Toss the cooled doughnuts in the cinnamon sugar until coated.
Pin It Now!

Monday, October 27, 2014

Braised Short Ribs with Parmesan Gnocchi

Braised Short Ribs with Parmesan Gnocchi
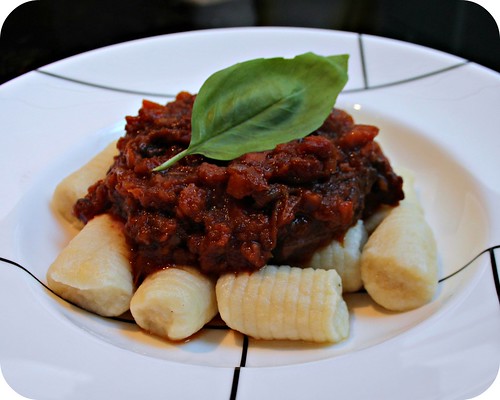
This recipe was a compilation from Martha Stewart and The Hopeless Housewife.  I love gnocchi, so does C.  Miss F took some convincing and I still don't think she was sold on it.  She just isn't a fan of potatoes, she doesn't even love French fries!  No worries, she didn't go hungry at all.  She calls short ribs, "more meat!" because that is what she always proclaims whenever we have it.  I don't think I will ever eat leftover mashed potatoes again, they will always be reserved for making gnocchi.  I have this nifty gnocchi roller that works perfectly for adding the grooves to the pasta.
Braised Short Ribs with Parmesan Gnocchi

1 to 1 ½ pounds boneless short ribs
1 teaspoon salt
1 teaspoon freshly cracked pepper
2 teaspoons vegetable oil
6 carrots, peeled and chopped
1 onion, chopped
2 cloves garlic
1 6-ounce can tomato paste
1 ½ cups red wine
2 cups beef broth
1 teaspoon thyme
1 bay leaf

2 cups mashed potatoes
1 large egg
1 cup flour
¼ cup grated Parmesan
¼ teaspoon salt

fresh basil

Preheat the oven to 275 degrees. Season the short ribs with salt and pepper. In a dutch oven, heat the vegetable oil over medium high heat and sear all sides of the short ribs, about 2 to 3 minutes per side. Remove the short ribs and set aside. Pulse the carrots, onion and garlic in a food processor four or five times, until roughly minced. Add the carrots, onion and garlic to the dutch oven and saute until tender, about two minutes. Stir in the tomato paste and saute for a minute more. Add the wine to deglaze the pan, scraping up any browned bits from the bottom. Stir in the beef broth, thyme and bay leaf. Return the short ribs to the pot and cover. Place in the oven and cook for 3 hours, until tender. Remove the short ribs from the pot and shred the meat with two forks. Return the meat to the pot and stir to combine, salt and pepper to taste.

Boil 6 quarts of water in a large pot. Stir together the mashed potatoes and egg yolk, then stir in the flour, Parmesan and salt. If the dough it still quite sticky, add more flour a tablespoon at a time. Place the dough on a floured surface and knead a couple times. Divide the dough into four equal pieces, then roll each into ½" diameter logs. Cut into 1" long gnocchis, the use a fork to add grooves to each. Place the gnocchi into the large pot and cook until they rise to the top. Remove with a slotted spoon and top with the short ribs and basil.
Pin It Now!

Friday, October 24, 2014

Oven Fried Parmesan Drumsticks

Oven Fried Parmesan Drumsticks
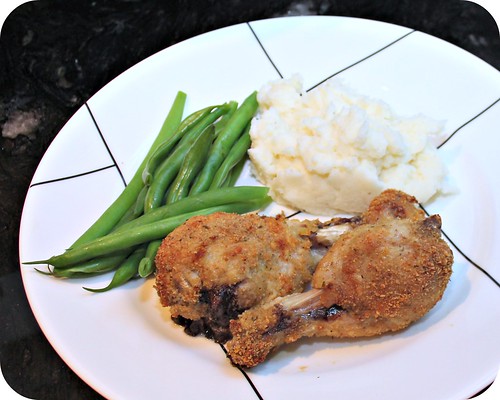
I love "frying" chicken in the oven. When I saw this recipe from Diabetic Living via Pinterest, I knew it would be a hit in our house. I wish frying chicken didn't cause the house to smell like a fryer for days on end.  Miss F and C were both huge fans of the chicken, as was I.  C wanted mashed potatoes with skins on, but since I knew I was going to use the leftovers to make gnocchi, so I got to make them creamy, just like my mom makes.  Who wants lumpy mashed potatoes with skins?
Oven Fried Parmesan Drumsticks

1 egg, beaten
2 tablespoons milk
1/3 cup grated Parmesan Cheese
1/3 cup bread crumbs
1 teaspoon oregano
½ teaspoon paprika
½ teaspoon salt
¼ teaspoon pepper
8 chicken drumsticks, skinned
2 tablespoons butter, melted

Preheat the oven to 375 degrees. Grease a baking pan. In a shallow bowl, whisk together the egg and milk. In a second shallow bowl, stir together the parmesan, bread crumbs, oregano, paprika, salt and pepper. Dip the drumsticks in the egg mixture, coating completely, then dip each in the bread crumb mixture, coating completely. Place on the baking pan and drizzle with the melted butter. Bake for 45 to 55 minutes, serve.
Pin It Now!

Wednesday, October 22, 2014

Chipotle Chicken Fajita Spaghetti

Chipotle Chicken Spaghetti
I always keep chipotle peppers in the freezer. I never use a whole can in any recipe, so it is quite convenient to always have some on hand. This recipe came about when my mom brought me several bell peppers and cilantro from her garden. The chipotle adds such a nice spice to the dish. Miss F gobbled this right up, she has been a big fan of bell peppers lately. I think it is because we harvest them from the garden. We have tomatoes, bell peppers, pumpkins, cucumber and okra in the fall garden. I can't wait to get them all! 
Chipotle Chicken Fajita Spaghetti

1 pound spaghetti
1 tablespoon olive oil
2 boneless skinless chicken breasts, cut into strips
1 green bell pepper, sliced
1 red bell pepper, sliced
½ onion, sliced
¼ cup white wine
½ cup chicken stock
1 chipotle pepper, minced
1 tablespoon of adobo sauce
½ cup heavy cream
2 tomatoes, chopped
1 tablespoon chopped cilantro

Prepare the spaghetti per package directions, drain and set aside. Heat the oil in a large saute pan over medium high heat. Add the chicken, bell peppers, and onion, saute for 6 to 8 minutes. Deglaze the pan with the wine, then stir in the chicken stock, chipotle and adobo sauce. Cook for 2 to 3 minutes. Reduce the heat to low and stir in the cream and tomatoes. Toss the spaghetti with the sauce, chicken and bell peppers. Top with cilantro and serve.
Pin It Now!

Monday, October 20, 2014

Jack Skellington Cookies

Jack Skellington Cookies
I have never decorated cookies in any sort of fancy way. A smear of buttercream and a dousing of sprinkles is about as far as I would go. Miss F saw this recipe in our fall issue of the Mickey Monitor (the Disney annual passholder newsletter) and she had to make them. I was very wary. C insisted he would draw the faces since I was so nervous about it. I originally bought black gel icing to decorate them, but that was a total fail. My Kroger didn't carry black food coloring, but our local Party City did (so does Amazon.) Royal icing was SO much easier to use than I expected. I used these nifty tools to pipe the eyes, nose and mouth.
Jack Skellington Sugar Cookies

2 ½ cups flour
1 teaspoon baking powder
½ teaspoon salt
¾ cup butter, softened
1 cup sugar
2 eggs
½ teaspoon vanilla extract

2 egg whites
3 cups confectioner’s sugar
Black food coloring paste

Combine flour, baking powder and salt in a medium bowl and whisk until combined. Set aside. Combine butter and sugar in the bowl of an electric mixer and beat until smooth. Beat in eggs and vanilla. Add flour mixture in three parts. Once dough comes together, cover bowl with plastic wrap and refrigerate for at least 1 hour.

Preheat oven to 400 degrees. On a floured surface, roll out dough to ¼ inch thickness. Using a round cookie cutter or an overturned cup, cut dough into circles about 3 inches in diameter. Place cookies 1 inch apart on an ungreased cookie sheet. Bake 8 to 10 minutes or until golden brown. Cool completely before icing.

Place egg whites in bowl of an electric mixer; whisk until frothy. Add confectioners’ sugar a little at a time, until thick but still spreadable. Place 1/3 of icing in a separate bowl. Add black food coloring paste to reserved icing and stir until color is uniform. Decorate cooled cookies by covering with white icing and letting it dry (placing cookies in the refrigerator will speed up this process). Place black icing in a pastry bag or a plastic resealable bag and cut off a tiny bit of the corner to create a very small hole. Use black icing to draw eyes, nostrils and stitched mouth on each cookie.
Pin It Now!

Friday, October 17, 2014

Bacon Wrapped Pork Tenderloin

Bacon Wrapped Pork Tenderloin
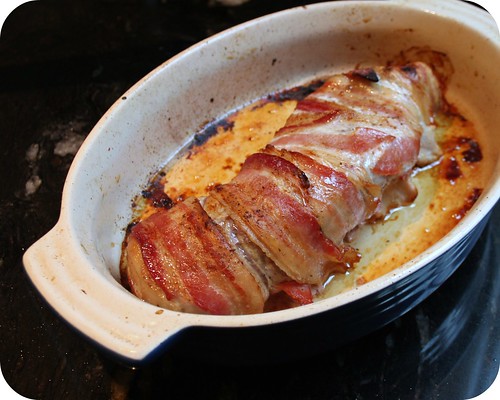
Years ago, I received a Taste Book of my friend's family recipes as a gift. I use several of the recipes in the book, but the bacon wrapped pork tenderloin is the one I go back to the most often. I swapped out the seasoning for my Maryland friendly Old Bay, but other than that, I am very true to the recipe. Miss F loves bacon in any format, so this tenderloin is always a hit. This would be great for a dinner party because you could prep it in advance and cook it while you socialize with your guests.  Be sure to broil it at the end to really crisp up the bacon, there is nothing worse than soggy bacon!
Bacon Wrapped Pork Tenderloin

1 pork tenderloin, trimmed
1 teaspoon Old Bay
1 clove garlic, sliced
5 slices of bacon

Preheat the oven to 375 degrees. Sprinkle the Old Bay all over the outside of the pork tenderloin, making sure to coat the meat evenly. Make slashes in the meat with a knife every inch or so, nestle a garlic slice in each notch. Wrap the tenderloin in the bacon and place in a baking dish. Bake for 45 minutes, until the pork has reached an internal temperature of 155 degrees. Turn on the broiler and broil for 2 to 4 minutes to crisp the bacon. Let the meat rest for 10 minutes, slice and serve.
Pin It Now!

Wednesday, October 15, 2014

Steakhouse Honey Wheat Bread

Steakhouse Honey Wheat Bread
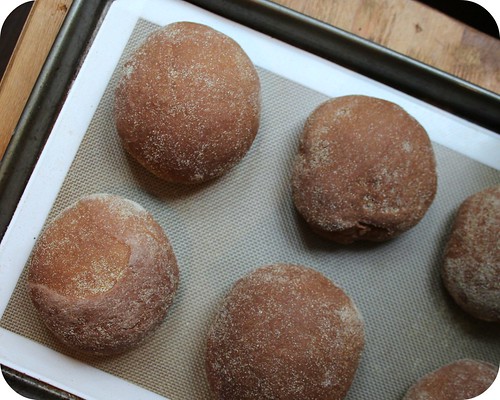
I have a major bread obsession. And honey wheat bread is near the very top of my favorite bread list, probably only surpassed by sourdough, which I am still not brave enough to try at home.  These adorable mini bread boules were perfection.  The undertones of molasses, cocoa and honey made for a near perfect bread.  This recipe is adapted from Never Enough Thyme.  I definitely agree with her recommendation to use plenty of butter when enjoying this bread, the more butter the better.
Steakhouse Honey Wheat Bread

1 ¼ cups warm water (105-110 degrees)
2 teaspoons sugar
2 ¼ teaspoons yeast
2 cups bread flour
1 ¾ cups whole wheat flour
1 ½ tablespoons cocoa
1 teaspoon salt
2 tablespoons butter, softened
¼ cup honey
2 tablespoons molasses
Yellow cornmeal for dusting

Combine the water in sugar in a two cup measure, sprinkle the yeast overtop and allow to sit for five minutes. Mix together the flours, cocoa and salt in the bowl of a stand mixer. Add the yeast mixture, butter, honey and molasses to the bowl. Stir to incorporate. Knead for 8 to 10 minutes on low. Remove the dough from the bowl, spray the bowl with cooking spray and return the dough to the bowl. Turn to coat all the dough in cooking spray. Cover and let rise in a warm place for one hour, until doubled in size. Divide the dough into six equal portions. Form each portion into a round boule. Sprinkle cornmeal on the work surface. Moisten each boule very lightly and roll in the cornmeal. Place on a silpat lined baking sheet, cover and let rise for one hour more, until doubled in size. Preheat the oven to 350 degrees. Uncover the dough and bake for 35 to 40 minutes, cool for 10 to 15 minutes and serve.
Pin It Now!

Monday, October 13, 2014

Chicken and Dumplings

Chicken and Dumplings
I love dumplings. They were one of my favorites as a kid, whenever my mom made beef stew, I always filled up on dumplings and ate very little of the stew itself. And whatever stew I did eat, I dipped it in ketchup, even the carrots.  This recipe from Smells Like Home is a classic chicken and dumplings recipe.  I can still pretend it is fall, even though the temperatures are still in the 80s and 90s around here.  I used my disher to scoop out the dumplings and it really made things quite easy. 
Chicken and Dumplings

2 ½ pounds bone-in, skin-on chicken thighs and legs
2 teaspoons canola oil
4 carrots, peeled and sliced ¼ inch thick
2 ribs celery, sliced ¼ inch thick
1 onion, minced
¼ cup flour
1 tablespoons dry sherry
3 cups low-sodium chicken broth
¼ cup milk
1 teaspoon dried thyme
1 teaspoon dried parsley
2 bay leaves
1 cup frozen green peas

2 cups all-purpose flour
1 tablespoon baking powder
1 teaspoon salt
1 cup milk
3 tablespoons butter

Pat the chicken dry and season with salt and pepper. Heat the oil in a Dutch oven over medium-high heat. Add the chicken, skin side down and brown both sides. Remove the chicken from the pot and remove the skin from the chicken. Add the carrots, celery, onion and ¼ teaspoon salt to the pan. Cook until the vegetables have softened, about 7 minutes. Stir in the flour, then whisk in the sherry, scraping up any browned bits. Whisk in the broth and milk, then add the thyme, parsley and bay leaves. Return the chicken to the pot, cover and simmer on low for one hour. Remove the chicken and bay leaves from the pot. Discard the chicken bones and then shred the meat. Stir the shredded chicken into the stew, add the peas, then salt and pepper to taste.

Stir the flour, baking powder, and salt together in a medium bowl. Add the milk and butter to a two cup measure, microwave for one minute. Stir the milk into the flour mixture just until combined. Scoop out golf ball sized pieces of batter and gently lower them into the stew. Reduce the heat to low, cover and simmer for 15 to 18 minutes. Serve.
Pin It Now!

Friday, October 10, 2014

Crockpot Cheddar Beer Chicken Tacos

Crockpot Cheddar Beer Chicken Tacos
Cheddar cheese is a big winner at my house. Miss F and C both cannot get enough of it, so when I saw this recipe from How Sweet It Is, I knew it would be a hit.  And I also knew that both of them would pile their tacos high with even more cheese, even though I assured them both that plenty of cheese had already been mixed in with the chicken.  This recipe reminds me of one of my favorites, crockpot chicken tacos, but without the seasoning packet.  I really enjoyed this spice blend and I am going to use it in place of the taco seasoning packet when I make it next.  Miss F also enjoyed the leftover chicken in quesadillas in her lunch box, with plenty additional cheese. 
Crockpot Cheddar Beer Chicken Tacos

2 teaspoons chili powder
1 ½ teaspoons cumin
½ teaspoon smoked paprika
¼ teaspoon garlic powder
¼ teaspoon onion powder
pinch of cayenne pepper
½ teaspoon salt
1 cup beer
1 pound boneless, skinless chicken breasts
½ cup grated cheddar cheese + more for topping
12 tortillas
toppings: sour cream, avocado, cilantro, salsa, onion, black beans, tomato

In a small bowl, stir together the chili powder, cumin, garlic, onion, paprika, cayenne, and salt. Stir in the beer. Add the chicken to a greased crockpot. Pour the beer mixture over top. Cook on low for 7 to 8 hours. Shred the chicken with two forks and leave in the crockpot for 15 additional minutes. Turnn off the crockpot and stir in the cheddar cheese. Assemble the tacos, adding whatever toppings you desire.
Pin It Now!

Wednesday, October 8, 2014

Apricot Roast Chicken

Apricot Roast Chicken
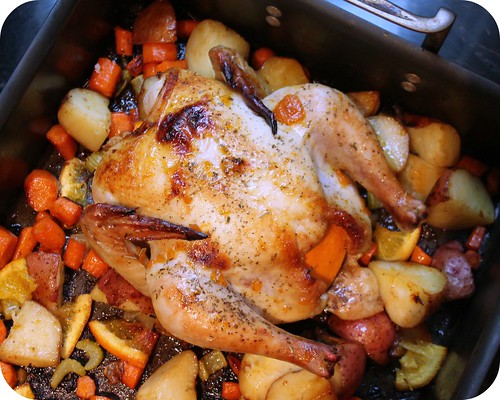
I love roast chicken, especially when cooked over a bed of root vegetables. It is so easy to prep and always yields impressive results.  This recipe is amazingly easy and perfect for an autumn Sunday dinner.   I adapted this recipe from the Organic Kitchen, I even used an organic whole chicken because I got one in the meat sale bin.  It was so much smaller than the franken chickens I am used to, which meant that it actually worked for a weeknight meal because it cooked up so quickly.  The sweet orange and apricot glaze made for delicious chicken skin.
Apricot Roast Chicken

One whole chicken
3 tablespoons olive oil, divided
2 tablespoons apricot preserves
1 orange, half sliced and half juiced
1 teaspoon Herbes de Provence
5 red potatoes, halved
8 carrots, peeled and cut into 2 inch pieces
4 shallots, peeled (if small leave whole, if large cut in half)
2 stalks celery, chopped

Preheat the oven to 350 degrees. Clean the chicken, removing all giblets. Place the chicken in a roasting pan. Whisk together 2 tablespoons of the olive oil, the orange juice and apricot preserves in a small bowl, brush the mixture on all sides of the chicken and stuff the juiced orange half in the cavity. Sprinkle the chicken with half of the Herbes de Provence, ½ teaspoon salt and ¼ teaspoon pepper. Layer the potatoes, carrots, shallots and celery around the chicken, toss with the remaining tablespoon of olive oil. Sprinkle with the remaining Herbes de Provence, ½ teaspoon salt and ¼ teaspoon pepper. Place the roasting pan in the oven and roast for 20 minutes per pound, until the temperature of the thickest part of the thigh reaches 155 degrees. Remove from the oven, tent with foil and let rest for 10 minutes. Carve and serve.
Pin It Now!

Monday, October 6, 2014

Texas Toast

Texas Toast
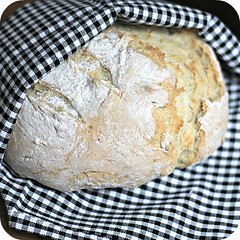
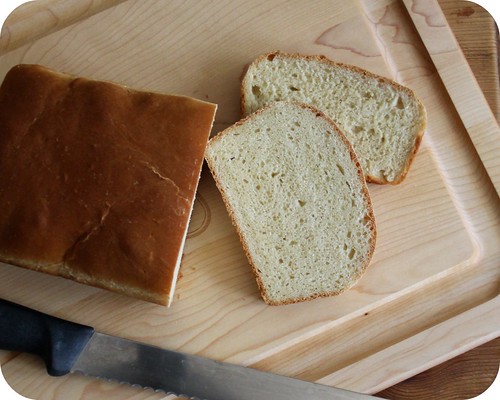
C: What is this brick bread?
Me: What are you talking about?
Miss F: Can we build a house with it?
C would much prefer the inflate with air Mrs Baird's Texas Toast from the grocery store, but Miss F and I much prefer homemade bread, whether or not you can build a house with it is still up for debate. I love having a big slice of Texas Toast with barbecue, it is what makes the meal. I have always loved bread, it is probably my most favorite food group. This bread goes perfectly with barbecue, but it also made amazing sandwiches the following day. I am always looking for new breads to bake for Miss F's lunch box and this recipe is definitely going into the usual rotation. Recipe based from Just a Pinch.
Texas Toast

3 to 3 ½ cups flour
2 ¼ teaspoons yeast
1 cup milk
2 tablespoons sugar
2 tablespoons butter
1 teaspoon salt
1 egg

In the bowl of the stand mixer, combine 1 ½ cups of the flour and the yeast. In a small saucepan, heat milk, sugar, butter and salt over medium heat until the butter is just melted, stirring constantly. Add the warm milk to flour mixture, then add the egg. Beat at low speed for 30 seconds, scraping the bowl. Beat at high speed for three minutes and stir in the remaining flour. Swap out the mixing paddle for the kneading attachment and knead at low speed for 6 minutes. Shape into a ball, cover and let rise in a warm place for one hour.

Punch down the dough, cover and let rest for 10 minutes. Place the dough into a greased loaf pan and let rise 30 minutes more. Bake in a 375 degree oven for 35 to 40 minutes, cover with foil for the last 15 minutes. Remove from the pan and cool on a wire rack. Slice into 1" thick slices.
Pin It Now!

Friday, October 3, 2014

Tomatillo Chicken

Tomatillo Chicken
This may be one of the ugliest meals I have made in awhile. And it was also one of the tastiest. I ate over half of my chicken breast during dinner and decided to save the remainder for lunch the next day. It didn't make it to lunch. About an hour after dinner, I went into the fridge and devoured the rest. The chicken was full of flavor from the brine and the sauce, based on my favorite Deluxe Tomatillo Sauce from Chuy's, was perfection.  Thanks to Confections of a Foodie Bride for the brining inspiration and thanks to my friend Jen for always agreeing to meet me for lunch at Chuy's.
Tomatillo Chicken

4 cups water
2 tablespoons sugar
1 tablespoon salt
juice from one lime
4 boneless skinless chicken breasts
1 can (28 ounces) tomatillos, drained
1 cup chicken broth
1 teaspoon cumin
1 teaspoon fresh lime juice
1 clove garlic, minced
½ jalapeno, minced
¼ teaspoon salt
¼ teaspoon sugar
1 cup sour cream
3 cups cooked white rice

Stir together the water, sugar, salt and lime juice in a sealable plastic bag. Add the chicken breasts and refrigerate overnight.

Preheat the oven to 375 degrees. Grease a baking dish and add the chicken in a single layer. Bake for 20 to 25 minutes, until cooked through.

In a saucepan, combine tomatillos, broth, cumin, lime juice, garlic, jalapeno, salt and sugar. Bring to a boil, reduce heat and simmer for 20 minutes. Remove from heat. Puree until smooth with an immersion blender. Return to heat, stir in the sour cream and cook 3 minutes more until heated through. Serve the chicken over the rice with the tomatillo sauce poured over top.
Pin It Now!

Wednesday, October 1, 2014

White Chocolate Chip Banana Bread

White Chocolate Chip Banana Bread
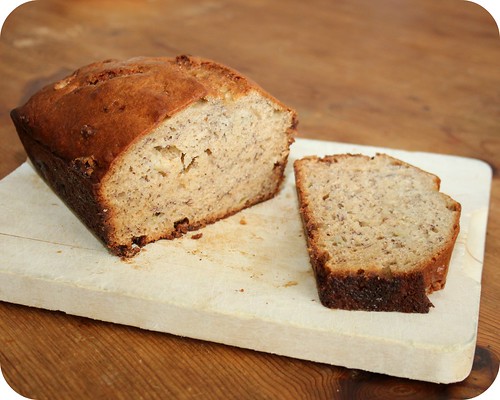
Miss F has a banana bread obsession. She loves it. She will eat it for breakfast, as a snack and even as dessert after dinner. I remember loving it as a kid as well, so I always use my mom's recipe to take me back to childhood. I had some white chocolate chips left over from these cookies, so I decided to adapt mom's recipe a bit and add them. The chips melted in with the bread and it made for the most decadent banana bread ever. Miss F was a huge fan and so was I.  If you don't have unsweetened applesauce on hand, use 1/2 cup of vegetable oil instead.
White Chocolate Chip Banana Bread

1 ¾ cup flour
¾ teaspoon baking soda
½ teaspoon salt
½ cup sugar
1 ¼ teaspoon cream of tartar
2 eggs
¼ cup vegetable oil
¼ cup unsweetened applesauce (may use vegetable oil in place of applesauce)
2 over ripe bananas
½ cup white chocolate chips

Preheat the oven to 350 degrees. In a large bowl, sift the first five ingredients together. In a medium bowl, beat the eggs, oil, applesauce and bananas at medium speed until well combined. Stir the wet ingredients into the dry ingredients until well combined, stir in the chips. Grease the loaf pan and fill with the batter. Bake for 45 minutes, let cool before slicing.
Pin It Now!

Monday, September 29, 2014

Crockpot Barbecue Brisket

Crockpot Brisket
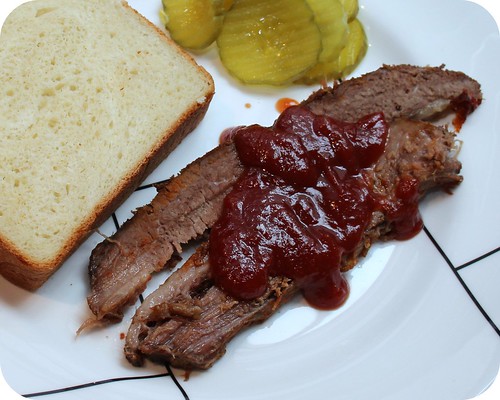
Before I moved to Texas, barbecue meant pulled pork, ribs or grilled chicken. I had never had brisket before I moved here and I wasn't a huge fan initially, once I learned the right places to get it and my preferred way to eat it (on Texas Toast with pickles, barbecue sauce and a bit of ranch dressing,) I grew to love it. C used to smoke brisket back when we had a charcoal grill, but it has been years since he had made it. I had bought a huge cut for the barbacoa beef and only ended up using half. This recipe from Taste of Home was intriguing. And delicious. I loved the way the brisket turned out. Tender and full of flavor, without the hassle of smoking it all day long.  C was not impressed with the barbecue sauce though, he still prefers the Kraft variety from the bottle (fool!)
Crockpot Barbecue Brisket

1 teaspoon salt
1 teaspoon chili powder
½ teaspoon garlic powder
¼ teaspoon onion powder
¼ teaspoon celery seed
¼ teaspoon pepper
1 fresh beef brisket (2-1/2 pounds), trimmed

½ cup ketchup
½ cup chili sauce
¼ cup packed brown sugar
¼ cup cider vinegar
2 tablespoons Worcestershire sauce
1 teaspoon mustard

In a small bowl, combine the first six ingredients; rub over brisket. Place in a 3-qt. slow cooker.
In a large bowl, combine the sauce ingredients. Pour half over the brisket; set the remaining sauce aside.
Cover and cook on high for 4-5 hours or low for 8 to 10 hours, until the meat is tender. Simmer the reserved sauce in a small saucepan over low heat for 20 minutes before serving. Slice and serve with the reserved sauce.
Pin It Now!
Related Posts Plugin for WordPress, Blogger...