Sunday
Monday
Tuesday
Wednesday
Thursday
Friday
Saturday
lattice chicken pot pie
Mexican street corn pasta
chicken Ghiveci
creamy chicken tortilla soup, jalapeno jack popovers
butter basted ribeyes, twice baked potatoes, broccoli
brisket tacos, pinto beans
pork souvlaki, naan

Thursday, September 29, 2016

Instant Pot Chipotle Shredded Beef


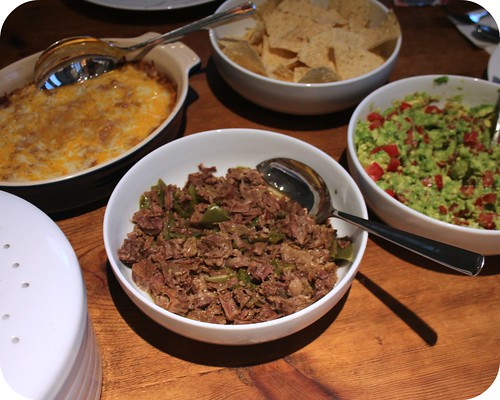
I am still learning on perfecting my skills with the Instant Pot, but I do very much love the results when I cook with it. The only thing I wish is that I had a better grasp of how long it will take to come to pressure and for how long it will take to release the pressure naturally.  When I have other things cooking for dinner, like the cheesy refried bean casserole, it would be very helpful to know exactly how many minutes before the Instant Pot is done.  If you do things well in advance, there is no worry since the Instant Pot switches to an easy "keep warm" mode.  This beef was amazing.  We had tacos the first night and then into quesadillas with the leftovers.  This recipe was adapted from Taste and Tell.
Instant Pot Chipotle Shredded Beef

1 pound beef chuck roast
1 tablespoon olive oil
1 chipotle in adobo, chopped
1 teaspoon dried cumin
½ teaspoon dried oregano
1 teaspoon salt
¼ teaspoon black pepper
½ teaspoon chili powder
½ onion, peeled and quartered
½ green bell pepper, seeded and cut into large chunks
½ cup water

Set the Instant Pot to saute. Add the olive oil. Brown the roast in the heated oil, about 3 minutes per side. Spread the chipotle over the roast, then sprinkle with cumin, oregano, salt, pepper and chili powder. Add the onion and bell pepper, pour the water around the edges of the roast. Close the Instant Pot and set for high pressure for 35 minutes. Allow the natural pressure to release when complete. Remove the meat from the Instant Pot and allow to rest for 5 minutes. Shred the meat with two forks and return to the Instant Pot, stirring into the liquid. Serve in warmed tortillas.

Pin It Now!

Monday, September 26, 2016

Thai Sweet Chili Shrimp


C was in London for a week for work, which meant it was seafood for dinner every night he was gone. I first became obsessed with Thai Sweet Chili sauce years ago at a sushi restaurant. They served it alongside their fried calamari appetizer. When we were in Vancouver, specifically China Town, we were looking for a spot to grab an early dinner. A man came out of a restaurant and raved to me about the Thai Sweet Chili Shrimp on the menu, he said it was a must order. And he was right! I have craved that dish for the longest time and really wanted to try and recreate it at home.  I adapted this recipe from Once Upon a Chef.
Thai Sweet Chili Shrimp

1 pound shrimp, peeled and deveined
2 tablespoons cornstarch
1 tablespoon vegetable oil
2 tablespoons bell pepper, finely chopped
2 teaspoons finely grated fresh ginger
2 cloves garlic, minced
1 tablespoon Thai Sweet Chili Sauce
¼ cup water
1 teaspoon soy sauce
¼ teaspoon Asian sesame oil
2 cups cooked white rice

Toss the shrimp with the cornstarch until lightly coated. Heat the oil in a large skillet over medium-high heat, add the oil. Add the shrimp and stir fry until starting to turn pink, about 2 minutes. Add the bell pepper, ginger, garlic and sweet chili sauce, sauté for 30 seconds. Add the water and soy sauce and cook 2 minutes more. Stir in the sesame oil and serve over rice.
Pin It Now!

Thursday, September 22, 2016

Instant Pot Enchiladas Verdes


I am not a huge fan of enchiladas made with a red sauce, but enchiladas with a creamy green sauce? A total obsession.  In researching my new Instant Pot, I saw all the ways you could make shredded chicken.  When I read that you could make deliciously tender chicken with only a can of enchilada sauce, I was intrigued.    I used my favorite sour cream green enchilada recipe and adapted it for the Instant Pot.  It made things incredibly easy and the chicken was amazing.  Way better than my usual go to of poaching the chicken and shredding it.  This recipe is quite generous with the sauce, so be very careful when pouring over the enchiladas. 
Instant Pot Enchiladas Verdes

1 pound boneless skinless chicken breasts
1 can green enchilada sauce
12 corn tortillas
2 cups shredded Cheddar Jack cheese
3 tablespoons butter
3 tablespoons flour
2 cups chicken broth
1 cup sour cream
½ cup tomatillo salsa (or your favorite salsa verde)

Add the chicken and enchilada sauce to the Instant Pot. Set to “Poultry” for 10 minutes if using fresh chicken or for 30 minutes if using frozen chicken breasts. When the pressure has released, shred the chicken with two forks and return it to the cooking liquid.

Preheat the oven to 350 degrees. Spray a 9x13 pan with cooking spray. Wrap the tortillas in a damp paper towel and microwave for 40 seconds. Mix the chicken with 1 cup of the cheese. Place a couple spoon fulls of the chicken mixture in each tortilla, roll up and place in the prepared pan.

In a sauce pan, melt the butter over medium heat. Whisk in the flour and cook for a minute or so, whisking the whole time. Whisk in the broth and cook 1 minute. Add broth and whisk until smooth, heat for 5 minutes until thick and bubbly. Remove from the heat and stir in the sour cream and salsa. Pour the sauce over the rolled tortillas and top with the remaining cheese. Bake for 20 minutes, then turn on the broiler and broil for 3 minutes or so to brown the cheese. Serve.
Pin It Now!

Monday, September 19, 2016

Garlic Pull Apart Bread


I love baking bread, it is so much better than anything you can get at the store and I have perfected the timing of it all so that it doesn't take an entire day to produce one loaf of bread. C and Miss F devoured this loaf.  And they added additional butter, which wasn't necessary at all, but I couldn't convince them otherwise. I can't wait to try other flavors of pull apart bread, but one thing is certain, the next loaf will include cheese of some sort.  This recipe was inspired by Budget Bytes.
Garlic Pull Apart Bread

1/3 cup warm water
2 ¼ teaspoons dry active yeast
1 cup warm milk
3 tablespoons sugar
2 tablespoons butter, melted (I microwave it with the milk)
1 teaspoon salt
3 ½ cups flour
¼ cup butter, melted
2 teaspoons garlic salt

Add the water to the bowl of the stand mixer, sprinkle the yeast overtop and proof for 5 to 7 minutes, until frothy. Add the milk, sugar, butter, salt and flour, mix at low speed until combined. Swap out the mixer attachment for the dough hook and need for 8 minutes more. Transfer to a lightly oiled bowl and allow to rise in a warm place for 1 hour.

In a small bowl, combine the butter and garlic salt. Cut dough into 1 inch pieces; dip into butter mixture. Layer in a greased 9x5 inch loaf pan. Cover and let rise until doubled, about 30 minutes. Bake at 350 degrees for 30 minutes or until golden brown.
Pin It Now!

Thursday, September 15, 2016

Copycat Doubledave’s Pizza Rolls


One of the first Aggie games I ever attended started out with a stop at Doubledave's. I had never been to a Doubledave's before, but C raved about their pizza rolls.   At lunch, they are usually served on a buffet and he can eat a dozen or so.  I am not a huge fan of pepperoni, but I will tolerate it in pizza rolls.  Miss F and C were thrilled with these.  Next time I make them, I will definitely double the recipe, since I was left with only one pizza roll to eat.  Thankfully, I had a big salad, so I wouldn't be starving after having dinner.  This recipe was guided by a post on TexAgs.
Copycat Doubledave’s Pizza Rolls

½ cup warm water
1 teaspoon active dry yeast
1 ½ teaspoons sugar
1 teaspoon salt
1 tablespoon olive oil
1 ½ cups bread flour
4 slices provolone cheese, halved
40 pepperoni slices
½ cup crushed tomatoes or ranch dressing

In the bowl of a stand mixer, stir together the water, yeast and sugar. Allow to sit for 5 minutes, until the mixture begins to get bubbly. Add the salt, oil and half of the flour. Turn on the mixer on low and add remaining flour ¼ cup at a time, until it is all incorporated. Swap out the mixer for the dough hook and knead for 6 minutes. Form into a ball and cover with plastic wrap. Allow to rise for 1 to 2 hours.

Preheat the oven with a pizza stone inside to 425 degrees. Roll out the dough into a 12” circle. Line the edges with the provolone slices and top with the pepperoni slices, 5 per half slice of cheese. Cut the dough into 8 pizza slices. Roll each up like a croissant. Place the rolls on the pizza stone and bake for 12 to 14 minutes. Serve with warmed crushed tomatoes or ranch dressing.


Pin It Now!

Monday, September 12, 2016

Instant Pot Dr Pepper Pulled Pork


Miss F loves sandwiches for dinner. As long as they are hot sandwiches, she still refuses to eat any kind of lunchmeat, which certainly makes packing lunches trying. I love any excuse to make a homemade sandwich bun (I served these on cheddar hamburger buns, one of my favorites.)  Dr. Pepper pulled pork is so incredibly easy and it's even easier with the Instant Pot.   I am using the Instant Pot so often these days, I have finally gotten the hang out it.  This was Miss F's choice for her dinner on her first day of school...second grade, where is the time going?  She also selected the tator tots.  Not shocking.
Instant Pot Dr Pepper Pulled Pork

4 pounds pork shoulder
2 tablespoons brown sugar
1 tablespoon paprika
2 teaspoons chili powder
1 teaspoon garlic powder
1 teaspoon onion powder
1 teaspoon salt
¼ to ½ teaspoon cayenne pepper
1 tablespoon vegetable oil
1 cup Dr Pepper

Cut the pork shoulder into 4 or 5 pieces, trimming any large pieces of fat. In a small bowl, stir together the brown sugar, paprika, chili powder, garlic powder, onion powder, salt and cayenne pepper. Coat the pork pieces with the spice mixture and allow to sit at room temperature for 30 minutes. Add the oil to the Instant Pot and set it to Sauté. Sauté the pork pieces 3 minutes per side until it is browned an all sides. Pour the Dr Pepper over the pork . Set the machine to cook on high pressure for 55 minutes. Close up the pot. After it is done cooking, allow the pressure to release naturally. Remove the pork from the pot and shred with two forks, discarding any large chunks of fat. Toss the meat with the cooking liquid. Serve on hamburger buns, topped with barbecue sauce and pickle slices.
Pin It Now!

Thursday, September 8, 2016

Four Ingredient Carbonara


I may never add cream to carbonara ever again. And since it shouldn't be used traditionally in carbonara anyhow, I am completely fine with that. The sauce is still incredibly rich with six eggs and a ton of parmesan cheese.  Unfortunately, pancetta is completely rejected by both C and Miss F, even though it is the traditional meat used in carbonara, I use bacon instead in order to get my family to eat what's on their plate without complaints.  Miss F even dunked her broccoli in the sauce, she loved it so much.  Now that school has started, I need meals that come together quickly in the evening since on some nights Miss F doesn't get home until after 5 pm.  Carbonara to the rescue for a quick and delicious meal.  Miss F requested that the broccoli be mixed with the carbonara next time I make it.  I think I could fry it in the bacon grease, how delicious would that be?
Four Ingredient Carbonara

6 slices bacon, cut into lardons
1 ¼ cups grated parmesan cheese
6 eggs
12 ounces thin spaghetti

In a large skillet, fry the bacon over medium heat until crisp. Drain all but a tablespoon of the grease from the pan. Set aside. Separate 4 of the eggs, discarding the whites. Add the 4 egg yolks and 2 remaining whole eggs to a two cup measure. Add the parmesan cheese and whisk well to combine with the eggs. Prepare the spaghetti per package instructions. Drain the pasta, reserving the cooking water. Add the drained pasta to the pan with the bacon and pour the egg and parmesan over top. Toss well to coat, thin if necessary with the reserved pasta water. Serve with fresh cracked pepper over top.
Pin It Now!

Thursday, September 1, 2016

Chicken in Lemon Herb Sauce


I had this pinned from Elly Says Opa for the longest time and I finally got around to making it, I sure wish I had sooner.  The method is incredibly simple, but makes for a really nice and moist chicken breast.  Miss F refused to try it at all, I think she was exhausted from school.  She ate a few green beans and went straight to bed.  The sauce was delicious, I may have added a spoonful or two to my green beans and mashed potatoes.  I want to try it again adding prosciutto.  A sauce made with wine, garlic and butter...what could be better?
Chicken in Lemon-Herb Sauce

1 ½ pounds boneless, skinless chicken breasts
½ cup dry breadcrumbs
2 tablespoons olive oil, divided
3 tablespoons freshly chopped parsley
1 ½ teaspoons dried oregano
2 tablespoons grated Parmesan cheese
1 cup dry white wine
½ cup chicken broth
¼ cup freshly squeezed lemon juice (1 large lemon)
½ teaspoon crushed red pepper
½ teaspoon salt
4 cloves garlic, peeled and smashed
1 tablespoon butter

Preheat the oven to 475 degrees. Cut each chicken breast crosswise into two pieces, pound each piece flat with a meat mallet, about 1/3” thick. Stir together the breadcrumbs, 1 tablespoon olive oil, parsley, oregano and parmesan in a small bowl. Sprinkle half of the bread crumbs over each chicken piece, then roll the chicken up, securing with a piece of kitchen twine or a couple of toothpicks. Place the chicken into an oven safe skillet. In a two cup measure, add the wine, broth, lemon juice, crushed red pepper and salt. Pour over the chicken and add the garlic to the pan. Bake for 10 minutes. Remove the skillet from the oven and top with the remaining breadcrumbs. Bake for an additional 5 minutes, until the breadcrumbs are golden brown. Remove the chicken to a serving plate. Place the skillet on a burner over medium-high heat. Bring to a simmer and allow to thicken for a minute or two. Remove the pan from the heat and stir in the butter. Pour the sauce around the chicken and serve.
Pin It Now!
Related Posts Plugin for WordPress, Blogger...