Sunday
Monday
Tuesday
Wednesday
Thursday
Friday
Saturday
lattice chicken pot pie
Mexican street corn pasta
chicken Ghiveci
creamy chicken tortilla soup, jalapeno jack popovers
butter basted ribeyes, twice baked potatoes, broccoli
brisket tacos, pinto beans
pork souvlaki, naan

Monday, September 29, 2014

Crockpot Barbecue Brisket

Crockpot Brisket
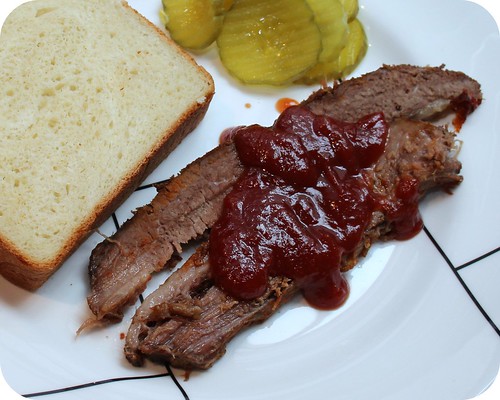
Before I moved to Texas, barbecue meant pulled pork, ribs or grilled chicken. I had never had brisket before I moved here and I wasn't a huge fan initially, once I learned the right places to get it and my preferred way to eat it (on Texas Toast with pickles, barbecue sauce and a bit of ranch dressing,) I grew to love it. C used to smoke brisket back when we had a charcoal grill, but it has been years since he had made it. I had bought a huge cut for the barbacoa beef and only ended up using half. This recipe from Taste of Home was intriguing. And delicious. I loved the way the brisket turned out. Tender and full of flavor, without the hassle of smoking it all day long.  C was not impressed with the barbecue sauce though, he still prefers the Kraft variety from the bottle (fool!)
Crockpot Barbecue Brisket

1 teaspoon salt
1 teaspoon chili powder
½ teaspoon garlic powder
¼ teaspoon onion powder
¼ teaspoon celery seed
¼ teaspoon pepper
1 fresh beef brisket (2-1/2 pounds), trimmed

½ cup ketchup
½ cup chili sauce
¼ cup packed brown sugar
¼ cup cider vinegar
2 tablespoons Worcestershire sauce
1 teaspoon mustard

In a small bowl, combine the first six ingredients; rub over brisket. Place in a 3-qt. slow cooker.
In a large bowl, combine the sauce ingredients. Pour half over the brisket; set the remaining sauce aside.
Cover and cook on high for 4-5 hours or low for 8 to 10 hours, until the meat is tender. Simmer the reserved sauce in a small saucepan over low heat for 20 minutes before serving. Slice and serve with the reserved sauce.
Pin It Now!

Friday, September 26, 2014

Crockpot Barbacoa Beef

Crockpot Barbacoa Beef
I rarely cook with beef brisket, this recipe from The Kitchn reminds me that I should add it to my meal plan more often.  The meat is so tender and perfect for tacos.  Miss F kept referring to it as chicken, I have no clue why.  She requested "that chicken" in her lunch box quesadillas every day the week I made this.  I think we have beef so rarely, that she really doesn't know the taste as well as chicken, pork and seafood.  She is a Texas girl, so I need to get more beef in her diet.
Crockpot Barbacoa Beef

1 chipotle pepper with adobo, minced
½ red onion, peeled and chopped
3 cloves garlic, peeled and crushed
½ teaspoon cumin
1 teaspoon kosher salt
Juice of 1 lime
2 tablespoons cider vinegar
1 to 2 pounds beef brisket
1 ½ cups beef or chicken stock
1 bay leaf

To serve:
tortillas
diced onions
diced tomatoes
diced avocado
shredded colby jack
sour cream
salsa

Add the chipotle, onion, garlic, cumin, salt, lime juice, and vinegar to the crockpot Place the brisket on top of the mixture and pour the stock over top. Top with the bay leaf, toss to coat the meat. Cover and cook on low for 8 to 10 hours. Remove the meat from the crockpot and shred with two forks, discarding excess fat. Return the beef to the crockpot, toss with the cooking liquid. Serve on tortillas with onions, tomatoes, avocado, cheese, sour cream and salsa.
Pin It Now!

Wednesday, September 24, 2014

Spicy Mango Chicken Sandwiches

Spicy Mango Chicken Sandwiches
My friend Courtney introduced me to Pick-a-Peppa spicy mango sauce.  A few years later she discovered that she is allergic to mangoes. We were at a party with mango sorbet added to champagne and she had a nasty reaction. So, no more mangoes for her. I had a similar experience with a late in life allergic reaction (tree nuts,) so I can totally relate.  I love this sauce, the combo of spicy and sweet is perfect on these sandwiches. I used Bolillo rolls for these sandwiches, but any sub roll will work fine. Thanks to Cookaholic Wife for the inspiration.
Spicy Mango Chicken Sandwiches

2 large boneless skinless chicken breasts
½ teaspoon salt
1 jalapeno pepper
¼ cup shredded pineapple
1 tablespoon spicy mango sauce (I use Pick-a-Peppa brand)
4 sub rolls
8 slices provolone cheese

Place the chicken breasts in a saucepan with a lid, cover with water and add the salt, jalapeno pepper and juice from the pineapple. Bring the water to a boil over medium high heat, reduce the heat to low, cover and simmer for 10 to 15 minutes, until chicken is cooked through. Remove the chicken from the cooking liquid and shred with two forks. Slice the jalapeno. Toss the shredded chicken with the pineapple, hot sauce and jalapeno.

Preheat the oven to 425 degrees. Toast the sub rolls in the oven for 2 to 3 minutes, spoon the chicken mixture in each roll and top each with two slices of cheese. Return to the oven for 2 to 3 minutes, until cheese melts. Serve.
Pin It Now!

Monday, September 22, 2014

Pizza Chips

Pizza Chips
Years ago (and I mean YEARS,) I would meet my friends Jess and Shannon at a place in Clear Lake called Boondoggles. On Thursday nights they would serve crab legs (yum!) and we would gorge ourselves silly. To start every meal there, we always ordered pizza chips, served with marinara AND ranch dressing for dipping. Only in Texas do you find people mixing marinara sauce with ranch dressing.   I have been meaning to try and re-create it at home for YEARS.  I saw this recipe from Lauren's Latest on Pinterest and I knew it would be a winner.  The three of us polished off nearly the entire plate of pizza chips.  C was happy because it was quite cheesy and Miss F couldn't get enough. 
Pizza Chips

½ cup warm water
1 teaspoon active dry yeast
1 ½ teaspoons sugar
1 teaspoon salt
1 tablespoon olive oil
1 ½ cups bread flour

2 tablespoons salted butter
1 clove garlic, finely minced
¼ cup grated parmesan cheese
¾ cup grated mozzarella cheese

In the bowl of a stand mixer, stir together the water, yeast and sugar. Allow to sit for 5 minutes, until the mixture begins to get bubbly. Add the salt, oil and half of the flour. Turn on the mixer on low and add remaining flour ¼ cup at a time, until it is all incorporated. Swap out the mixer for the dough hook and knead for 6 minutes. Form into a ball and cover with plastic wrap. Allow to rise for 1 to 2 hours.

Preheat the oven to 500 degrees with a pizza stone inside. Mix together the butter and garlic in a small bowl and set aside. Form the dough into a 12 inch circle and place on parchment paper. Melt the butter with the garlic, then brush over the dough, top with the mozzarella and parmesan cheese. Transfer the dough to the pizza stone using the parchment paper. Bake for 8 minutes, until golden brown and bubbly. Let cool for 2 minutes, then cut into strips with a pizza slicer.
Pin It Now!

Friday, September 19, 2014

Mexican Sour Cream Rice

Mexican Sour Cream Rice
I would have hated this dish as a kid, so Miss F must take after me. This must mean she will grow to enjoy it when she is older, right? She was not a fan at all, but C and I enjoyed it very much. C did say that Rice-a-Roni would have been preferable, he even called it a "tasty treat" when describing it to Miss F.   I was shocked that she didn't enjoy it, she usually loves rice and I thought the addition of cheese and corn would make her happy.  She explained that she likes all those things individually, just not mixed up together.  Nonetheless, this was a great side dish and I enjoyed it  much more than my usual TexMex side dish go-to of beans.  Thanks to Taste of Home for the fantastic recipe! 
Mexican Sour Cream Rice

1 cup uncooked long grain white rice
2 cups chicken broth
1 cup sour cream
1 (4 ounce) can diced green chile peppers
1 cup shredded Monterrey Jack cheese, divided
1 ½ cups frozen corn
salt and ground black pepper

In a sauce pan, bring the rice and chicken broth to a boil. Reduce heat to low, cover, and simmer 20 minutes. Preheat oven to 350. Lightly grease a 1 ½ quart casserole dish.

Stir together the rice, sour cream, green chiles, ½ cup of the cheese and corn, season with salt and pepper. Transfer to the prepared casserole dish and top with the remaining cheese. Bake uncovered 30 minutes, until cheese is bubbly and lightly browned.
Pin It Now!

Wednesday, September 17, 2014

White Chocolate Chip Cookies

White Chocolate Chip Cookies
This cookies are huge, nearly too big for a lunch box, but that didn't deter Miss F from taking one in her lunch every day this week. The recipe is from Ina Garten and the cookies are delicious. I understand why Miss F wanted one every single day. Now that is in Kindergarten, she has a lot more independence at lunch time. Which meant the first week of school she came home with everything healthy in her lunch uneaten. We had a talk about how I she finished her lunch, she could have the treat packed in her lunch. So far, this has worked quite well. So she continues to get lunch box treats. What is your favorite nut-free cookie recipe?
White Chocolate Chip Cookies

1 cup butter at room temperature
1 cup light brown sugar, packed
1 cup granulated sugar
2 teaspoons vanilla extract
2 eggs
2/3 cup unsweetened cocoa
2 cups flour
1 teaspoon baking soda
1 teaspoon kosher salt
2 cups white chocolate chips

Preheat the oven to 350 degrees.

Cream the butter and both sugars until light and fluffy in the bowl of an electric mixer fitted with the paddle attachment. Add the vanilla, then the eggs, 1 at a time, and mix well. Add the cocoa and mix again. Sift together the flour, baking soda, and salt and add to the chocolate with the mixer on low speed until just combined. Fold in the white chocolate chips.

Drop the dough on a baking sheet lined with parchment paper, using a 1 3/4-inch ice cream scoop or a rounded tablespoon. Dampen your hands and flatten the dough slightly. Bake for exactly 15 minutes (the cookies will seem underdone). Remove from the oven and let cool slightly on the pan, then transfer to a wire rack to cool completely.
Pin It Now!

Monday, September 15, 2014

Fettucine Alfredo with Quattro Pasta

Fettucine Alfredo with Quattro Pasta
Miss F and C have a favorite dish that can only be enjoyed at Carmine's in Chicago. We call their fettucine alfredo "daddy pasta" and we all love it very much. C forced me to try it on my first ever trip to Chicago years ago, I had never had alfredo sauce before that day. It was so good. The reason: freshly made pasta. I took a pasta cooking class at Quattro at the Four Seasons in Houston, the pasta we made there was better than Carmine's. So I decided to make the pasta at home with alfredo sauce, it was the natural choice. This pasta is amazing and totally worth the work.  The alfredo recipe is adapted from Emeril and the pasta recipe is courtesy of Quattro, in a greatly reduced format.  The original recipe we were sent home with called for 70 egg yolks.
Fettucine Alfredo

1 pound fettucine
6 tablespoons unsalted butter
1 clove garlic, minced
1 cup heavy cream
1 cup finely grated parmesan
½ teaspoon salt
¼ teaspoon freshly ground black pepper

Prepare the fettucine per the directions below, drain reserving ¼ cup of the pasta water in the pot it was cooked in.

While the pasta is cooking, melt the butter in a sauce pan over medium-high heat. Add the garlic and saute for 30 seconds. Add heavy cream; bring to a boil. Cook for 5 minutes, until the sauce has thickened slightly.

Return the pasta to the pot it was cooked in, set over medium-high heat along with the reserved cooking liquid. Add the butter-cream mixture and half of the parmesan and toss to combine thoroughly. Season with salt and pepper, to taste. Plate and sprinkle with the remaining parmesan, serve immediately.

Quattro Fresh Pasta

1 1/3 cup flour
2/3 cup semolina flour
10 egg yolks
1 tablespoon olive oil
¾ teaspoon salt

In the bowl of a stand mixer, combine all ingredients. Mix at medium speed for 8 to 10 minutes, reaching a smooth consistency. Wrap the dough in double plastic wrap and allow to rest in the refrigerator overnight. Prepare the pasta per your pasta makers directions. Cook in boiling salted water for 2 minutes, drain.
Pin It Now!

Friday, September 12, 2014

Panko Pork with Apricot Dipping Sauce

Panko Pork with Apricot Dipping Sauce
This meal was originally supposed to be an apricot pork stir fry.  The birthday dinner for my dad had been postponed and I had a jar of apricot jam I had bought to make his favorite baked brie.  C and I ended up meeting for lunch and we had Thai food, so I wasn't in the mood for a stir fry that evening, neither was he.  So Panko Pork with Apricot Dipping Sauce was born.  We'll call it the sweeter relative of Pork Things.  Miss F devoured hers, but she preferred to dip hers in mustard.  Crazy kid!
Panko Pork with Apricot Dipping Sauce

½ cup apricot jam
1 tablespoon Dijon mustard
1 tablespoon soy sauce
1 tablespoon apple cider vinegar
1 teaspoon Sriracha

1 egg
½ teaspoon kosher salt
¼ teaspoon freshly ground black pepper
1 cup Panko (Japanese breadcrumbs)
2 boneless center-cut pork chops, pounded to 1/8" thickness
3 tablespoons vegetable oil, divided

In a small saucepan, stir together the jam, mustard, soy sauce, vinegar and Sriracha. Heat over medium to bring to a simmer, about 2 to 3 minutes.

Whisk the egg in a medium bowl. Combine Panko, salt, and pepper on a large plate. Dip in egg mixture, then in Panko, pressing to adhere. Heat 2 tablespoons vegetable oil in a large nonstick skillet over medium heat and cook pork until golden brown and cooked through, about 2 minutes per side, adding 1 tablespoon vegetable oil after turning. Drain on paper towels. Serve the pork with the prepared apricot sauce.
Pin It Now!

Wednesday, September 10, 2014

Mellow Mushroom Pizza Dough

Mellow Mushroom Pizza Crust
Miss F loves to make pizza, she is an amazing helper. She has gotten better at making doughs with me and she loves to operate the KitchenAid stand mixer. When we made this crust, she spilled a little bit of flour. She spent nearly the next hour playing with that flour. She was writing in it, moving it around and drawing in it. Pure kid entertainment! I got this recipe from Eva Bakes. She noted a sweetness to the crust, but I felt the molasses added a nice spice. I have never had Mellow Mushroom pizza before, but I recently learned there was a shop north of Houston. I will have to give it a try sometime soon to compare this crust to the original. I also wish we had double ovens when making pizza, I have to make a pepperoni pizza for C and Miss F, while I despise pepperoni and like to get a little more creative with my toppings.
Mellow Mushroom Pizza

1 ½ cups hot water
2 ½ tablespoons molasses
1 tablespoon olive oil
4 ½ teaspoons yeast
3 ½ cups bread flour
2 teaspoons salt
cornmeal (used for dusting your parchment paper)
melted garlic butter
parmesan cheese crumbs

In a two cup measure, stir together the water, molasses and olive oil. In the bowl of the stand mixer fitted with a dough hook, whisk together the yeast, flour and salt. Slowly pour in the water mixture, turn the mixer to medium-low and knead until smooth.

Transfer the dough in a well-oiled bowl, cover with plastic wrap or a wet towel and allow to rise in a warm spot until doubled (about 1-2 hours).

Preheat the oven to 500 degrees. Place your pizza stone in the preheated oven and allow it to heat for at least 30 minutes.

Divide the dough into two halves and form each half into a ball by folding the "sides" of the dough towards the back (imagine you are gift wrapping a balloon). Pinch the "sides" together in the back of the dough and press down slightly.

Cover each dough ball with a wet towel and allow to rise for another 30 minutes. At this point, you can bake the dough balls or transfer to a freezer bag and refrigerate or freeze for a later use.

To bake the dough, sprinkle some corn meal onto a piece of parchment paper. Place the dough down on the parchment, and working from the center, push the dough outwards (you may rotate the dough/parchment) to form a circle. Do not make the center too thin or else it will break.

Brush the top of the dough with olive oil and add your toppings. Bake on the preheated pizza stone for 7-9 minutes or until the crust is golden. Add garlic butter immediately after removing the pizza from the oven and sprinkle with shredded parmesan cheese.

Yield: Two 12-inch pizza crusts
Pin It Now!

Monday, September 8, 2014

Chewy Chocolate Chip Cookies

Chewy Chocolate Chip Cookies
I wanted to try a new chocolate chip cookie recipe for Miss F's first week of school. I liked this recipe because you had to refrigerate the dough before baking, which meant that I could bake small batches to keep the cookies fresh, reserving the remaining cookie dough in the refrigerator. This recipe is quite similar to my go-to, Big, Fat, Chewy Chocolate Chip Cookies, which I have memorized.  The dark brown sugar gives them a rich hue of brown and they taste amazing.  Miss F was a huge fan, she never tired of these cookies.  I cannot believe she is taking lunch to school every day now that she is in Kindergarten, where does the time go?  Thanks to The Spiffy Cookie for the recipe.
Chewy Chocolate Chip Cookies

2 ¼ cups all-purpose flour, spooned and leveled
1 teaspoon baking soda
1 teaspoon salt
1 cup (2 sticks) unsalted butter, melted and cooled
1 cup packed dark brown sugar
½ cup white sugar
1 tablespoon vanilla extract
1 egg + 1 yolk, room temperature
2 cups semisweet chocolate chips

Sift together the flour, baking soda, and salt; set aside.

In a medium bowl, cream together the melted butter, brown sugar and white sugar until well blended. Beat in the vanilla, egg, and egg yolk until light and creamy. Mix in the sifted ingredients in three batches until just blended. Fold in the chips by hand.

Roll 2 tablespoons of dough into a ball that is slightly taller than wide and place on a plate or tray. Cover tightly and chill for at least 2 hours, but overnight for best results.

Preheat oven to 375 degrees. Line cookie sheets with silicone baking mats or parchment paper; set aside. Place cookie dough onto the prepared cookie sheets, about 2 inches apart. Bake for 8 minutes or until edges are barely golden (will look underbaked). Cool on baking sheets for 10 minutes before transferring to wire racks to cool completely. Store at room temperature in an airtight container.
Pin It Now!

Friday, September 5, 2014

Hatch Chile Carbonara

Hatch Chile Carbonara
I asked C to bring me my camera just before serving this dinner. He was incredulous, "haven't you made this pasta 1000 times already?" Well, um, maybe...my carbonara obsession is real y'all!  I will say I was thrilled that I roasted the hatch chile in the afternoon and I didn't get a single complaint from C about the smell, so that was a win.  Miss F devoured this pasta and she loved the roasted hatch chiles.  I loved it so much, but this is no shock considering how much I love carbonara.  Now I just need to roast a bunch of hatch chiles and freeze them so that I can enjoy this dish year round.
Hatch Chile Carbonara

4 egg yolks
½ cup cream
¼ cup grated parmesan
¼ teaspoon salt
6 slices bacon, cut into lardons
1 roasted hatch chile, chopped
2 cups corn kernels
1 pound thin spaghetti

Whisk the eggs, cream, Parmesan and salt together in 2 cup measure Fry the bacon until crisp, drain and set aside. Drain all but one tablespoon of the bacon grease from the pan. Saute the chilis and corn in the grease for 1 to 2 minutes. Prepare the pasta per package directions. Add the drained pasta to the pan with the chilis and corn, pour the cream mixture over the pasta and stir over low heat for 1 minutes, top with the bacon and serve.
Pin It Now!

Wednesday, September 3, 2014

Chicken Tenders with Basil Aioli

Panko Chicken Tenders with Basil Aioli
"Why is this chicken white?" inquired C. As good as it is to have him home, it is still frustrating at dinner time. He and Miss F refused the aioli, opting instead for their own special sauce of mustard mixed with ketchup.  I loved the aioli, I may have added an extra dash of vinegar or so, I love the tartness.  Miss F gobbled up the chicken, she was a huge fan.  I served these with corn on the cob, but they would also be fantastic as an appetizer for a party.  I plan on serving them next while watching football...I am so glad football is back!  Thanks to Love and Olive Oil for the recipe. 
Chicken Tenders with Basil Aioli

1 pound boneless skinless chicken breasts, cut into strips
1 cup Panko breadcrumbs
1 teaspoon garlic powder
½ teaspoon smoked paprika
½ teaspoon cayenne
½ teaspoon kosher salt
½ teaspoon freshly ground black pepper
1 egg
1 tablespoon water

For aioli:
½ cup mayonnaise
2 teaspoons red wine vinegar
1 teaspoon garlic powder
1 tablespoon minced fresh basil
salt and pepper, to taste

Preheat the oven to 350 degrees. Grease a baking sheet with cooking spray and set aside.

In a shallow dish, stir together the Panko, garlic powder, paprika, cayenne, salt and pepper. In a second shallow dish, lightly beat the egg with the water. Toss the chicken in the egg, then dredge in the Panko mixture. Arrange on the prepare baking sheet and spray with cooking spray. Bake for 12 to 15 minutes, until golden brown, flip once halfway through.

While the chicken is cooking, prepare the aioli. Whisk together the mayonnaise, vinegar, garlic powder, and basil. Salt and pepper to taste. Serve the chicken with the aioli on the side.
Pin It Now!
Related Posts Plugin for WordPress, Blogger...