Sunday
Monday
Tuesday
Wednesday
Thursday
Friday
Saturday
lattice chicken pot pie
Mexican street corn pasta
chicken Ghiveci
creamy chicken tortilla soup, jalapeno jack popovers
butter basted ribeyes, twice baked potatoes, broccoli
brisket tacos, pinto beans
pork souvlaki, naan

Friday, May 30, 2014

Shrimp Ceviche Salad

Shrimp Ceviche Salad
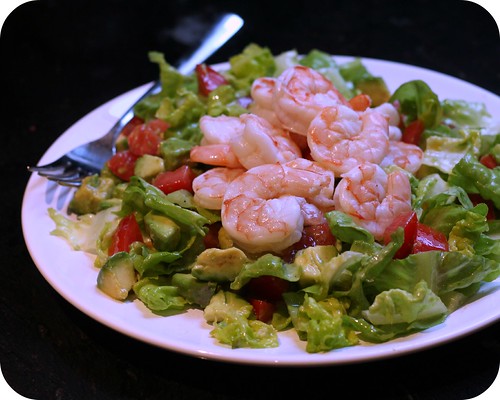
I love ceviche. When I saw Confections of a Foodie Bride's recipe, I knew I wanted to make some, but I wanted to use shrimp and put it on an entrée sized salad. Shrimp Ceviche Salad was born. I made a simple lime vinaigrette, I didn't want to get to fussy. I barely used any salt and pepper, it didn't really need too much.  I wanted to keep it light, since we were having whoopie pies for dessert, but this would also be excellent with a few fried tortilla wedges on the side to scoop up the shrimp and salad.  I will try the original ceviche recipe next time I get down to Kemah to pick up some fresh snapper.
Shrimp Ceviche Salad

½ pound shrimp, peeled and deveined
½ cup fresh lime juice

¼ cup lime juice
1 teaspoon sugar
¼ cup olive oil

3 cups mixed greens
2 plum tomatoes, diced
1 avocado, peeled, seeded and diced
½ red onion, sliced thin
2 tablespoons chopped cilantro

Toss the shrimp with ½ cup lime juice in a small dish. Set aside for at least ten minutes, until shrimp are pink.

Whisk together ¼ cup lime juice with the sugar. Stream in the olive oil, whisking the entire time. Salt and pepper to taste.

Toss together the greens, tomatoes, avocado, onion and cilantro with the lime vinaigrette. Divide between two plates and top with the shrimp ceviche. Serve.
Pin It Now!

Wednesday, May 28, 2014

Chocolate Sour Cream Bundt Cake

Chocolate Sour Cream Bundt Cake
I have had a poor relationship with my bundt pan lately. It seemed like for awhile, every cake I made was sticking to the pan. Then I was left with a bundt cake that was usually in two or three pieces. I stopped baking them for a bit. This time I was really thorough with my butter and cocoa powdering, but I was still very nervous when it was time to turn the cake out onto the cooling rack. Imagine my relief when it came out in one beautiful piece. And I didn't even have to use the glaze to cover up any trouble areas, there weren't any. I took this cake to my parents house to enjoy after feasting on blue crab. It was definitely a hit!. Thanks to Leite's Culinaria for the amazing recipe.
Chocolate Sour Cream Bundt Cake

1 cup (2 sticks) unsalted butter, plus more for the pan
1/3 cup cocoa powder
1 teaspoon kosher salt
1 cup water
2 cups all-purpose flour, plus more for the pan
1 ¾ cups sugar
1 ½ teaspoons baking soda
2 large eggs
½ cup sour cream
1 teaspoon pure vanilla extract

1/3 cup heavy cream
2/3 cups semi-sweet chocolate chips

Position a rack in the center of the oven and heat to 350 degrees. Butter and dust with cocoa powder a 10- or 12-cup Bundt pan and set aside. In a small saucepan, combine the butter, cocoa powder, salt, and water and place over medium heat. Cook, stirring, just until melted and combined. Remove from the heat and set aside. Place the flour, sugar, and baking soda in a large bowl and whisk to blend. Add half of the melted butter mixture and whisk until completely blended (the mixture will be quite thick). Add the remaining butter mixture and whisk until combined. Add the eggs, one at a time, whisking until completely blended before adding the next egg. Whisk in the sour cream and vanilla until smooth. Scrape the batter into the prepared pan and bake until a toothpick inserted into the center of the cake comes out clean, 40 to 45 minutes. Let the cake cool in the pan for 15 minutes and then invert onto a rack. Let cool completely before glazing.

Heat the cream in a small saucepan over medium heat until it just begins to bubble. Pour the hot cream over the chocolate chips and whisk until melted and smooth. Drizzle the glaze over the cooled cake, allowing it to drip and dribble down the sides.
Pin It Now!

Monday, May 26, 2014

Happy Memorial Day!

14109109815_b94677c572_o
I hope you all are having a wonderful Memorial Day with family and friends. It is officially the start of summer and I hope yours is filled with vacations, pool days and of course, summer barbecues. This is a snap from our recent trip to Walt Disney World. They had a Star Wars character breakfast on May the Fourth (ha!) at the the Sci Fi Dine-in. Miss F and C had so much fun with all the Star Wars characters, especially the Jawas.  Can you believe how tall Darth Vader is?  For reference, C is 6'1". 
Pin It Now!

Friday, May 23, 2014

California Fish Sandwich

California Fish Sandwich
I used to be obsessed with a California sandwich served at the café in Nordstrom. It was a chicken sandwich with avocado spread and alfalfa sprouts served on focaccia. It was amazing. And it was probably on the menu there 20 years ago. Times and tastes have changed, I still love sprouts, but I have not been able to find them anywhere.  I tried Central Market, Kroger, Trader Joes, Fiesta and Whole Foods. No sprouts at any of them.  My friend recommended ordering the seeds off Amazon and growing them yourself.  Desperate times!  The avocado spread was from BHG.
California Fish Sandwich

1 avocado, halved, seeded, and peeled
¼ cup olive oil
2 tablespoons lemon juice
1 tablespoon Dijon mustard
2 teaspoons sugar
4 small white fish filets (I used snapper)
1 tablespoon olive oil
salt and pepper
4 wheat buns
1 tablespoon olive oil
1 cup alfalfa sprouts
1 cucumber, sliced thin

In a blender or food processor combine avocado, olive oil, lemon juice, 2 tablespoons water, mustard, and sugar. Cover and blend until smooth; set aside.

Rub the filets with the oil and generously season with salt and pepper. Heat a skillet over medium high heat, add the fish to the pan skin side down and sauté for 3 to 5 minutes. Flip the fish over and sauté for 3 to 5 minutes more, until the fish is cooked through.

Split the wheat buns in half and brush the inside with olive oil. Broil the buns, oil side up, for 1 minute or so, until nicely toasted.

Spread the bottom half of each bun with ¼ of the avocado spread. Top each with snapper, sliced cucumber and sprouts. Add the top of the bun and serve.
Pin It Now!

Wednesday, May 21, 2014

Crispy Shrimp Pasta

Crispy Shrimp Pasta
This dinner couldn't be any easier. The meal comes together in under 20 minutes, I just steamed some broccoli to serve on the side and we were set. You could also boil some peas along with the pasta and toss it with the sauce. Miss F devoured the pasta, she couldn't get enough. When I told her the shrimp were crispy, I think she was thinking full on fried shrimp, which is one of her favorites. She wasn't as thrilled with the shrimp, but she ate all her broccoli, so I felt victorious. Feel free to adjust the Cajun seasoning to your taste or even omit it altogether, I might swap it with Old Bay next time I prepare this dish.  Thanks to Kevin and Amanda for the inspiration.
Crispy Shrimp Pasta

16 ounces linguine pasta
1 pound raw shrimp, peeled, deveined and tails removed
1 teaspoon kosher salt
1 teaspoon freshly ground pepper
3 tablespoons flour
1 tablespoon olive oil
1 tablespoon butter
½ cup white wine
1 tablespoon cornstarch
1 cup chicken broth
½ cup cream
½ teaspoon cajun seasoning

Prepare pasta per package directions. Sprinkle shrimp with salt, pepper, and toss to combine. Toss the shrimp in the flour. Melt butter and olive oil in a large skillet over medium high heat. When hot, add the shrimp in a single layer and cook on each side, flipping once, until golden brown, approximately 2 to 3 minutes per side. Remove to plate. Deglaze the pan with white wine, simmer for 1 minute. Whisk the cornstarch into the chicken broth in a two cup measure. Slowly add the cornstarch mixture to the pan, whisking constantly. Simmer for 3 minutes. Stir in the cream and cajun seasoning. Add the drained pasta and shrimp to the sauce, and stir to combine.
Pin It Now!

Monday, May 19, 2014

Red Velvet Whoopie Pies

Red Velvet Whoopie Pies
While we were in Disney World, Finley selected a red velvet whoopie pie for dessert in Epcot one evening. After she was served it, she realized hers was missing the white chocolate Mickey Mouse on the top, so off we went to exchange it, you can't have a whoopie pie without the mouse. Of course she wasn't able to finish the whole treat, so C and I were happy to help devour the rest of the cake. It was quite delicious and I promised to make some as soon as we returned home. I adapted quite a few recipes, but the main inspiration was from BHG.  I used red gel food coloring instead of regular food coloring.  I probably used three squirts worth.  Add the food coloring a bit at a time, checking the color until it becomes a rich red hue.  Miss F loved these, but she was really missing that white chocolate Mickey.
Red Velvet Whoopie Pies

2 cups flour
3 tablespoons unsweetened cocoa powder
½ teaspoon baking soda
¼ teaspoon salt
½ cup butter
1 cup light brown sugar
1 egg
½ cup buttermilk
1 teaspoon vanilla extract
2 tablespoons red food coloring

8 ounces of cream cheese, softened
2 cups of confectioners' sugar
1 teaspoon of vanilla

Preheat the oven to 375 degrees. Line 2 baking sheets with Silpats or parchment paper.

In a large bowl, mix together the flour, cocoa powder, baking soda and salt. Using a stand mixer or hand mixer, cream the butter until it is fluffy, about 2 to 3 minutes. Add in the sugar and beat the butter and sugar for another 3 minutes. Add the egg and beat four minutes more. Alternately add the flour mixture and buttermilk, beating well after each addition. Add the vanilla extract and food coloring. Keep mixing until the batter is creamy and thick.

Use a two tablespoon ice cream scoop to dish the cookies onto the prepared baking sheets. Bake the cookies for 9 to 11 minutes. Once the cookies have finished baking, place the cookies on a cooling rack and let them cool for about 15 minutes.

Beat together the cream cheese and confectioners' sugar until thick and creamy. Turn half of the cooled cookies upside down and spread with the prepared cream cheese frosting. Top each with another cookie. Serve.
Pin It Now!

Friday, May 16, 2014

Scalloped Potatoes

Scalloped Potatoes
I hated scalloped potatoes as a child. In fact, I hated most potatoes, even mashed potatoes. I am not sure when I began enjoying them, but eventually I discovered how delicious they were.  I did like French fries, but Miss F isn't even interested in them.  Miss F has the same potato aversion, but I hope she comes around soon. I will keep offering and she will probably continue to declare that she doesn't enjoy them.  C loves all cheesy potato dishes, so I knew these would be a hit with him. These potatoes are always nice for a group, they take little hands on time before serving, though they do take up valuable oven space. I adapted the recipe from Williams-Sonoma.
Scalloped Potatoes

2 teaspoons kosher salt
½ teaspoon freshly ground pepper
3 ¾ pounds baking potatoes
2 cups shredded white cheddar cheese
3 cups half and half
3 tablespoons flour

Preheat an oven to 350 degrees. Generously butter a 9-by-13-inch baking dish.

Mix together the salt and pepper. Peel the potatoes and thinly slice into rounds. Spread one-third of the potatoes in an even layer in the prepared baking dish and season with about one-fourth of the salt mixture. Top with one-third of the cheese and a tablespoon of the flour and season with about one-third of the remaining salt mixture. Top with half of the remaining potato slices, half of the remaining cheese another tablespoon of flour, seasoning with half of the remaining salt mixture as you go. Finish with the remaining potatoes, cheese and flour; season with the remaining salt mixture.

In a small saucepan, heat the half and half over medium-high heat until it is simmering. Pour the hot half and half evenly over the potatoes. Cover tightly with aluminum foil and place the baking dish on a rimmed baking sheet.

Bake for 1 hour. Remove the foil and continue baking until the potatoes are tender, coated with a creamy sauce and golden brown on top, about 30 minutes longer. Let stand for about 5 minutes, then serve hot.
Pin It Now!

Wednesday, May 14, 2014

Rosemary Sriracha Chicken Thighs

Rosemary Sriracha Chicken Thighs
This chicken was so delicious, Miss F made up a song about how much she loved it while we were eating it. We were having dinner and a movie night, watching Frozen just makes Miss F want to break out in song, she loves it so much. All of her made up songs are to the tune of either Let It Go or Do You Want to Build a Snowman?  This chicken would also be delicious on the grill, but broiling the last few minutes works great to get the skin good and crunchy.  Do not be afraid of the amount of Sriracha, it is not spicy at all.  There is a nice tang from it, as well as from the yogurt.  I marinated the chicken for a few hours, but overnight would work great as well.  Thanks to A Sweet Life for the amazing recipe.
Rosemary Sriracha Chicken Thighs

¼ cup plain yogurt
2 tablespoons olive oil
2 tablespoons fresh lemon juice
2 tablespoons chopped fresh rosemary
2 tablespoons Sriracha
2 cloves garlic
½ teaspoon salt
¼ teaspoon pepper
4 to 6 large bone-in, skin-on chicken thighs

In a medium bowl, whisk together yogurt, olive oil, lemon juice, rosemary, Sriracha, garlic, salt and pepper. Place chicken thighs in a large ziploc bag and pour marinade over. Turn bag over several times to coat chicken. Place in refrigerator and let marinate for at least one hour. Preheat the oven to 375 degrees. Arrange chicken thighs in a single layer in a baking dish or broiler pan. Spread any marinade remaining in the bag over the thighs. Bake 35 to 40 minutes, or until chicken is cooked through. Then broil on high for 4 minutes, until skin is crispy and golden brown.
Pin It Now!

Monday, May 12, 2014

Spring Salmon

Spring Salmon
I love salmon, love it. Add in white wine, cream and butter...you pretty much have heaven on a plate. The sauce for this salmon was perfection. And it worked amazingly well as a dip for my artichoke leaves as well. Miss F tried an artichoke leaf for the first time ever and promptly rejected it. I loved artichokes as a kid, they were quite a special treat and were always saved for the end of the meal. The salmon was easy to prepare and the sauce came together amazingly fast.  The sauce would work on most any fish, I will be trying it with some red snapper filets I picked up at the fish market next.  I adapted the recipe from Rachael Ray
Spring Salmon

3 tablespoons cold butter
2 skinless salmon fillets
½ cup white wine
¼ cup heavy cream
1 tablespoon fresh lemon juice
2 tablespoons chopped parsley
Coarsely ground black pepper
Lemon wedges

In skillet, heat 2 tablespoons butter over medium-high. Season fish; cook 3 minutes per side. Transfer to plates. Wipe skillet, then add next 3 ingredients; boil to thicken sauce. Off heat, whisk in remaining tablespoon butter. Spoon sauce over fish; top with parsley and pepper. Serve with lemon wedges.
Pin It Now!

Friday, May 9, 2014

Hot Artichoke Dip

Hot Artichoke Dip
I am not a huge spinach artichoke dip fan. I know a lot of people love it, but it just doesn't work for me and I am not quite sure why. Miss F is a sucker in Costco, nearly every sample we try, she wants to buy, doesn't matter what it is. Last visit, she was desperate for Veggie Chips. They came in a single industrial size bag, so I had to be sure she would eat them. She said she liked them more than Chili Cheese Fritos, so I went ahead and bought them. She ate then twice and was over it. But they worked great with this dip. Too bad I still have a ton left. She is not going to sway me our next trip to Costco, I will remain strong. I also served it with sliced baguette.
Hot Artichoke Dip

1 (8 ounce) block cream cheese, softened
1 cup mayonnaise
1 (14 ounce) can artichoke hearts, drained and chopped
2 green onions, sliced thin
½ cup grated Parmesan
1 cup shredded mozzarella
Dash hot sauce
Dash Worcestershire sauce
Salt and pepper

Preheat the oven to 350 degrees.

In a large mixing bowl, beat the cream cheese with a mixer until smooth, beat in the mayonnaise. Add remaining ingredients and stir together until combined. Transfer the dip to a pie plate or shallow gratin dish. Bake in a preheated oven for 30 to 40 minutes until the top is golden brown and the dip is bubbling. Serve hot with crackers, tortilla chips, crostini or veggies.
Pin It Now!

Wednesday, May 7, 2014

Raspberry Cheesecake

Raspberry Cheesecake
I made this cheesecake for Easter. Raspberries were on sale, so this was the perfect way to use a couple of delicious pints. I used my regular cheesecake recipe, but used the topping recipe from the wonderful Tide and Thyme.  This dessert is perfect for spring and summer berries.  I used homemade strawberry jam for the topping, it worked beautifully with the cheesecake.  Miss F waivers in her love for cheesecake.  I am never sure whether she will enjoy it or not.  She loved this version!
Raspberry Cheesecake

Crust:
1 ¼ cups graham-cracker crumbs
2 tablespoons light brown sugar
4 tablespoons melted butter

Filling:
3-8 ounce packages of cream cheese, room temperature
1-8 ounce container of sour cream, room temperature
1 ½ cups sugar
1 tablespoon lemon juice
3 eggs, room temperature

Topping:
2 pints fresh raspberries
¼ cup strawberry jelly

Preheat oven to 350 degrees.

Combine the graham-cracker crumbs and brown sugar. Mix well. Mix in the melted butter until well-moistened. Press mixture into a springform pan.

In the bowl of a stand mixer, beat cream cheese, sour cream and sugar on low speed until smooth. Scrape sides of bowl as needed ensure even mixing. Add in the lemon juice, then the eggs one at a time, mixing until each is well incorporated before adding the next one. Again, scrape down the sides of the mixing bowl as needed to get the mixture uniform.

Pour the filling into a springform pan and gently smooth the top of the filling. Place cheesecake in the oven, and reduce the heat to 300 degrees. Bake for 45 minutes. Do not open the oven again until the cheesecake is cooled. Turn off oven and keep the cheesecake in the oven for 2 hours (without opening oven). If the cheesecake doesn't feel 100% cool after 2 hours, allow to continue cooling, up to another hour or so. Refrigerate until firm, at least 4 hours.

To make the topping, melt the jelly in a small pan over low heat. In a bowl, toss the raspberries and the warm jelly gently until well mixed. Arrange the berries on top of the cheesecake. Refrigerate until ready to serve.
Pin It Now!

Monday, May 5, 2014

Crabcakes

Crabcakes
There are so many ways that I love crabcakes, on a sandwich, broiled with a lemon wedge on the side, fried drowning in crabcake sauce, I could go on and on and on.  But sometimes you just want a plain fried crabcake and that is where these beauties come in.  I really liked the Panko as a filler, it held up just as well as my usual crushed Saltine crackers.  And Panko is a lot easier than crushing crackers.  Miss F has decided that she loves crab meat after our last crab feast, she kept saying "more crab!"  She is still wary of crabcakes though, but I will win her over one day, I am certain of it. 
Crabcakes

1 large egg
3 tablespoons mayonnaise
1 ½ teaspoons Dijon mustard
1 teaspoon Worcestershire sauce
1 teaspoon Old Bay seasoning
¼ teaspoon salt
2 tablespoons finely chopped fresh parsley
1 pound lump crab meat
½ cup panko bread crumbs
Vegetable or canola oil, for cooking

Combine the egg, mayonnaise, Dijon mustard, Worcestershire, Old Bay, salt, and parsley in a large bowl and mix well. Gently fold in the crabmeat and panko. Shape into 4 crab cakes, cover and refrigerate for at least an hour. Preheat a large nonstick pan to medium heat and coat with canola oil. When oil is hot, place crab cakes in pan and cook until golden brown, about 3-5 minutes per side.
Pin It Now!

Friday, May 2, 2014

40 Minute Hamburger (Crabcake) Buns

40 Minute Hamburger Buns
Other than an In-n-Out Burger or a hamburger from McDonald's, I am not that into burgers. The Shake Shack Burger was good, but I prefer the super thin fast food patty variety. But I do love a crabcake sandwich topped with crabcake sauce. I was wary of a bun recipe from Taste of Home that only took 40 minutes and involved yeast, but there was no need to be. These buns were excellent. And they took less than 40 minutes to prepare, which was the perfect time period to prepare some crabcakes while making the buns.  I don't think I will ever buy a package of hamburger rolls from the store again, these buns were so easy and tasted amazing.  Maybe even good enough for me to start eating burgers at home.  C does have a grill at our new condo in Snowmass...
40 Minute Hamburger Buns

2 tablespoons active dry yeast
1 cup plus 2 tablespoons warm water (110° to 115°)
1/3 cup vegetable oil
¼ cup sugar
2 eggs
1 teaspoon salt
3 to 3 ½ cups flour
sesame seeds

In the bowl of a stand mixer, dissolve yeast in warm water. Add oil and sugar; let stand for 5 minutes. Stir in one of the eggs, salt and enough flour to form a soft dough. Using the dough hook of the stand mixer, knead until smooth and elastic, about 3 to 5 minutes. Divide into 8 pieces and shape each into a ball. Place 3" apart on greased baking sheet. Cover and let rest for 10 minutes. Whisk the other egg in a small bowl, brush the buns with the egg wash, sprinkle with sesame seeds, if desired. Bake at 425° for 8 to 12 minutes or until golden brown. Remove from pans to wire racks to cool, slice in half.
Pin It Now!
Related Posts Plugin for WordPress, Blogger...