Sunday
Monday
Tuesday
Wednesday
Thursday
Friday
Saturday
lattice chicken pot pie
Mexican street corn pasta
chicken Ghiveci
creamy chicken tortilla soup, jalapeno jack popovers
butter basted ribeyes, twice baked potatoes, broccoli
brisket tacos, pinto beans
pork souvlaki, naan

Thursday, July 30, 2015

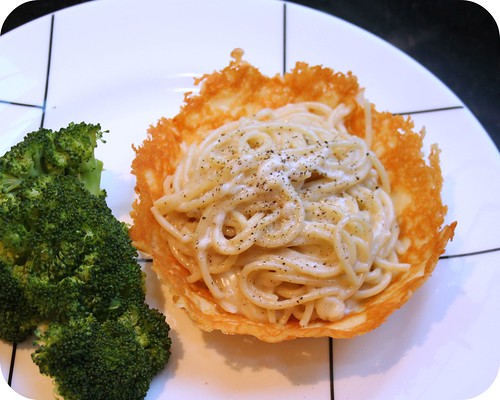
Cacio E Pepe


C sent me this recipe from Anthony Bourdain while I was away on vacation with Miss F and my parents. I added it to our weekly menu for when we returned home.  How can you go wrong with cheesy pasta inside a cheesy bowl?    I originally planned to make homemade pasta for this dish, but I decided against it because I think it would overcook in the sauce.  Dried pasta worked perfectly.  This was such a rich dish, but it was really quite simple to make.  I am going to try the same process next time I make fettuccine alfredo.
Cacio E Pepe

¾ cup grated parmesan

¾ pound tagliolini or spaghetti
3 tablespoons butter
1 tablespoon fresh cracked pepper
2 ½ cups grated pecorino cheese

Spread a very thin layer of cheese in a warm non-stick pan, forming into a 6” circle. Cook for 3 to 4 minutes, until the cheese is bubbling. Use a spatula to slide the cheese out of the pan over an upside down bowl that isn’t more than 2” high. Use tongs to press the cheese over the bowl. Set aside to cool.

Cook the pasta in a large pot of salted water for 3 minutes less than the package instructions. Reserve 2 ¼ cups of the pasta water.

Add the pasta water, butter and pepper to a hot skillet. Add the drained pasta to the pan and toss thoroughly in the water until the pasta absorbs nearly all of the water. Remove from the heat and add the grated cheese to the pasta, stir well to combine. Garnish with more grated cheese and pepper and serve in the parmesan bowl.
Pin It Now!

Monday, July 27, 2015

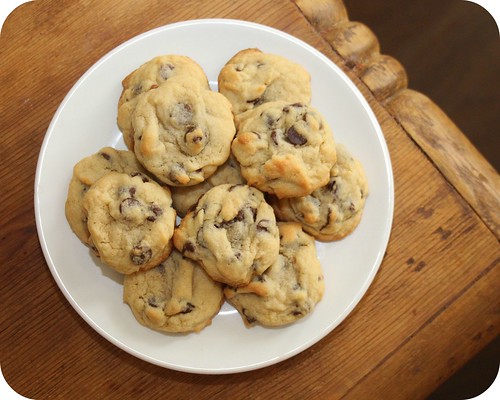
Puffy Chocolate Chip Cookies


I commented on this post from Tide and Thyme nearly four years ago. FOUR YEARS. How did it take me four years to get around to making these cookies?  Miss F calls these cookies "delicious cookies", which is quite adorable since she has a slight lisp right now from her missing top tooth.  They do not spread as much as my usual chocolate chip cookies and stay quite puffy.  Since school is starting back in just a couple weeks (where has the summer gone?), I know I will be making these often this fall for Miss F's lunchbox.  I found the cookies cooked up perfectly in 12 minutes, so be sure to check on them.
Chocolate Chip Cookies
Makes around 4 dozen cookies

3 cups all-purpose flour
1 teaspoon salt
1 teaspoon baking powder
1 cup butter, room temperature
1 cup light brown sugar
1 cup granulated sugar
2 eggs, room temperature
1 teaspoon vanilla extract
2 cups semi-sweet chocolate chips

Preheat oven to 375 degrees. Line cookie sheets with a Silpat or parchment paper. Sift flour, salt, and baking powder into a medium bowl. Set aside.

In the bowl of an electric mixer, cream the butter and sugars together until creamy. Reduce speed to low, and add the eggs (one at a time), and the vanilla. Mix to combine. Slowly add in the sifted flour and mix until just incorporated. Add the chocolate chips to the bowl and mix until they are distributed evenly.

Using a small cookie scoop or a spoon, drop 1-inch balls onto greased cookie sheet, about 2 inches apart. Bake at 375 degrees for 12 to 15 minutes. Cook on cookie sheet for a couple of minutes before transferring to cooling rack as cookies will be very soft.
Pin It Now!

Thursday, July 23, 2015

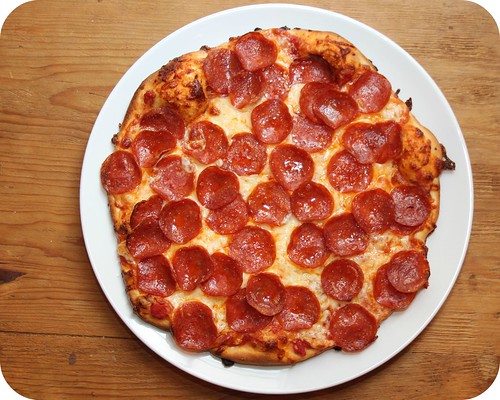
Pizza Pizzas


This was a fun recipe to make. I had been out a baby shower all afternoon and came home to make the pizza dough for the next night's dinner. The 15 minute kneading seemed crazy, but it made for a really nice dough to work with. It spread out perfectly for a nice crust when I shaped it the following day. Miss F had a blast topping it, she wanted every square inch covered with pepperoni, I think she was quite successful in her efforts. I had a plain mushroom pizza that I baked second, there weren't nearly as many mushrooms as pepperonis. This recipe is adapted from Alton Brown.
Pizza Pizzas

2 tablespoons sugar
2 teaspoons kosher salt
1 tablespoon olive oil
¾ cup warm water
2 cups bread flour
1 teaspoon instant yeast
2 teaspoons olive oil
Olive oil, for the pizza crust
Flour, for dusting the pizza peel
½ cup crushed tomatoes
1 cup shredded Italian cheese blend
Desired toppings

Place the sugar, salt, olive oil, water, flour and yeast in a stand mixer’s bowl. Using the paddle attachment, mix on low until it forms a ball. Swap the paddle for the dough hook and knead for 15 minutes on medium.

Tear off a piece of dough and flatten it, stretching it until thin. Hold up the dough to the light to see if the baker’s windowpane has formed. If the dough tears before it forms, knead for 5 to 10 minutes more.

Roll the dough into a smooth ball and place in a glass bowl. Add 2 teaspoons of olive oil and toss well to coat. Cover and refrigerate for 18 to 24 hours.

Place a pizza stone in the oven and preheat the oven to 500 degrees. Divide the dough into two balls and flatten each into a disk, then fold into a ball. Cover the ball with a towel and let rest for 30 minutes. Repeat with the other ball of dough.

Stretch the dough into a round disk, rotating after each stretch. I liken it to driving a car, just keep turning the wheel. Place the prepared dough onto a sheet of parchment paper.Top with the tomatoes, cheese and any desired toppings. Slide the parchment paper onto the pizza stone and bake for 7 to 9 minutes. Let rest 3 minutes before slicing.
Pin It Now!

Monday, July 20, 2015

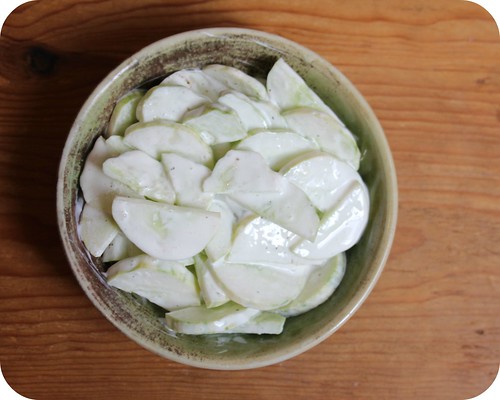
Creamy Cucumber Salad

Creamy Cucumber Salad
My grandmother made an amazing cucumber salad. But like many of her amazing dishes, there was no set recipe. It always went a little of this, a little of that...taste taste taste...then something perfect was served. She made a pie crust with vegetable oil that was insanely delicious and I don't know anyone who was able to successfully replicate it.  The only real success this year in my mom's vegetable garden has been cucumbers.  There have been a few tomatoes and bell peppers, but cucumbers have dominated the show.  C and Miss F refuse to try cucumber salad, so I keep it in a dish in the fridge and snack on it at random.  Or pull it out as a side for dinner in a single serving bowl.  This is the best I have been able to replicate my grandmother's dish, it is especially nice with homegrown cucumbers.
Creamy Cucumber Salad

¼ cup sour cream
1 teaspoon white vinegar
1 teaspoon sugar
¼ teaspoon salt
¼ teaspoon pepper
2 large cucumbers, sliced

Whisk together the sour cream, vinegar, sugar, salt and pepper. Stir in the sliced cucumber. Cover and chill for at least one hour. Serve.
Pin It Now!

Thursday, July 16, 2015

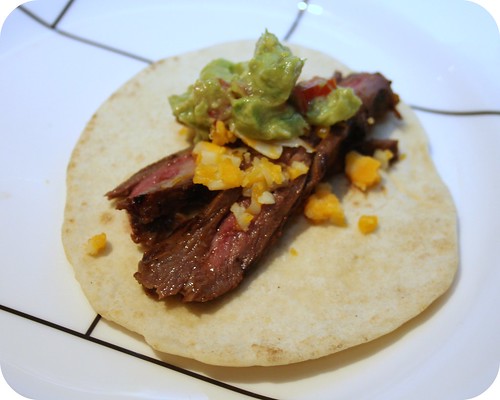
Mama Ninfa's Fajitas

Mama Ninfa's Fajitas
We now go to El Tiempo to get Mama Ninfa's fajitas, but when I first moved to Houston, Ninfas was my go to restaurant for TexMex fajitas.   Miss F prefers cheese enchiladas to fajitas, but she will tolerate them as long as she loads up beans in her tortilla as well.  The citrus really adds great flavor to the meat and the marinade couldn't be any easier.  I made these on my grill pan indoors, which was quite smoky fun, but they would be fantastic grilled outdoors.  Thanks to Culinary Houston for the recipe.
Mama Ninfa’s Original Fajtas

½ orange, zested
1 teaspoon fresh lemon zest
¼ cup fresh lemon juice
2 tablespoons water
2 tablespoons pineapple juice
2 tablespoons soy sauce
1 clove garlic, minced
1 ½ teaspoons black pepper
1 dried chiles de arbol crushed
1 skirt steak, no more than ¾ inch thick.

12 warm flour tortillas
Condiments such as Pico de Gallo, Cilantro, Sour Cream, Guacamole, etc.

Combine the orange and lemon zest, lemon juice, water, pineapple juice, soy sauce, garlic, pepper and chiles in a large baking dish. Use a sharp knife to remove any membrane from the meat and place it in the marinade. Cover with plastic wrap and marinate at room temperature for 1 hour. Grill for 5 to 7 minutes per side. Cut crosswise into 1” strips and serve warm on tortillas with any desired condiments.
Pin It Now!

Monday, July 13, 2015

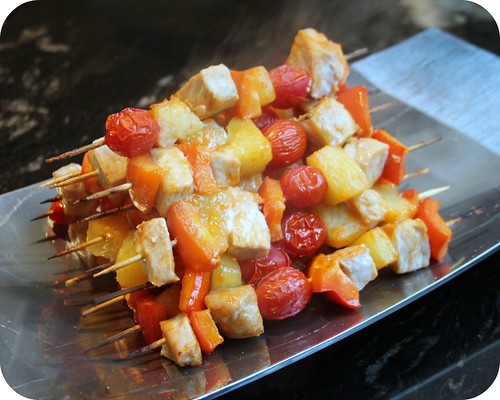
Sweet Sriracha Glazed Pork Skewers

Sweet Sriracha Glazed Pork Skewers
As soon as I saw this glaze on Pink Parsley, I knew I wanted to try it. I adapted it to include other veggies on the skewers for a more complete meal.  This glaze is amazing.  I am going to try it on chicken next.  Miss F had a grand time threading the skewers.  She made pork and bell peppers ones for herself and made skewers without tomatoes for C.  Feel free to make these on the grill, they would be equally fabulous on the barbecue.  Miss F had such a great time making the skewers, she made us fruit skewers for dessert that evening.  It's more fun to eat from a stick!
Sweet Sriracha Glazed Pork Skewers

1 pound boneless thick cut pork chops, cut into 1” cubes
1 teaspoon kosher salt
3 tablespoons brown sugar
2 tablespoons Sriracha
1 teaspoon cornstarch
1 bell pepper, seeded and chopped
1 small can pineapple chunks
1 cup grape tomatoes

Toss the pork and salt together in a bowl. Let stand at room temperature for 20 minutes. Whisk together the brown sugar, Sriracha and cornstarch in a small bowl. Soak wooden skewers in water and spray a broiler pan with cooking spray. Preheat the broiler to high. Thread the pork, bell pepper, pineapple chunks and tomatoes onto the skewers and place them on the prepared pan. Brush the skewers with half of the glaze. Broil the skewers for 4 to 5 minutes, flip the skewers and brush with the remaining glaze. Broil for 4 to 5 minutes more. Serve.
Pin It Now!

Wednesday, July 8, 2015

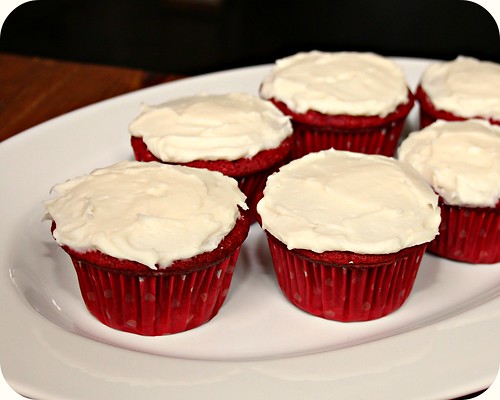
Red Velvet Cupcakes

Red Velvet Cupcakes
I love red velvet cake. I first fell in love because it is a far superior vehicle for cream cheese frosting than carrot cake. Cream cheese frosting makes everything better. I had a block of cream cheese in the fridge just begging to be turned into frosting. Miss F was a huge helper with these cupcakes, much more than her usual prepping the muffin tins with paper liners. The only issue with her helping in the kitchen is that she stands on one of our kitchen chairs, which makes getting around the kitchen a bit tricky.  She is still working on learning the difference between a teaspoon and a tablespoon, but she is really getting to enjoy cooking and baking.  Be mindful of the cook time on these and be sure to check on them right at 20 minutes, which was just perfect.  Thanks to Tide and Thyme for the perfect recipe. 
Red Velvet Cupcakes

2 ½ cups cake flour
1 teaspoon baking powder
2 tablespoons unsweetened cocoa powder
1 teaspoon salt
½ cup unsalted butter, softened
1 ½ cups sugar
2 eggs, at room temperature
1 teaspoon vanilla extract
1 cup buttermilk, at room temperature
1 to 2 teaspoons red gel food coloring
1 teaspoon white vinegar
1 teaspoon baking soda

Preheat oven to 350 degrees. Line two 12-cup muffin tins with cupcake papers. Sift together the cake flour, baking powder, cocoa and salt into a medium bowl; set aside. In a large bowl, using a hand mixer or stand mixer, beat butter and sugar together until light and fluffy, about three minutes.

Beat in eggs, one at a time, then beat in vanilla, scraping down the bowl with a spatula as you go. Add one third of the flour mixture to the butter mixture, beat well, then beat in half of the buttermilk. Beat in another third of flour mixture, then second half of buttermilk. End with the last third of the flour mixture, beat until well combined, making sure to scrape down the bowl with a spatula. Add the gel food coloring, a drop or two at a time, until a deep red color is reached.

In a small bowl, mix vinegar and baking soda. Add the vinegar mixture to the cake batter and stir well to combine. Using an ice cream scoop, fill cupcake cups with cake batter. Bake the muffin tins on the middle rack of a preheated 350 degree oven. Bake for approximately 20 to 22 minutes, until an inserted toothpick comes out clean.

Cool the cupcakes in their tins on a wire rack for 10 minutes then remove and allow to cool completely before frosting.

Cream Cheese Frosting

8 ounces cream cheese
4 ounces butter
3 ¾ cups confectioner’s sugar, sifted
½ teaspoon vanilla extract
1/8 teaspoon salt

Cream the butter, cheese and salt in a stand mixer until light and fluffy. Gradually add the sugar until incorporated, then add the vanilla and salt.
Pin It Now!

Monday, July 6, 2015

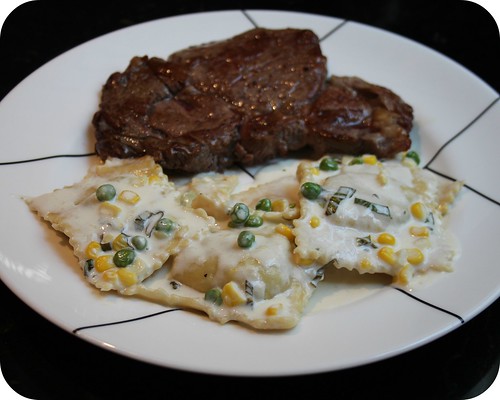
Sweet Corn and Pea Ravioli with Creamy Basil Sauce

Sweet Corn and Pea Ravioli with Creamy Basil Sauce
It was time to break out my birthday gift to make another batch of ravioli.  Which once again, meant I needed my hand sous chef, Miss F, to assist.  She and C were at the zoo that afternoon and had called me saying they were too hot to walk home.  I drove over to pick them up and immediately put my little chef to work.  She was a tremendous help.  I used the recipe for the pasta from our cooking class at the Four Seasons, it was much preferable to the recipe that came with the pasta roller.  I created the filling and the sauce on my own, it is exactly how I prefer my ravioli.  It was incredibly delicious and I went back for seconds.  C has requested butternut squash ravioli and Miss F has requested chocolate strawberry ravioli next...
Sweet Corn and Pea Ravioli with Creamy Basil Sauce

1 ¾ cups flour
1 cup semolina flour
6 egg yolks
3 tablespoons wine
1 tablespoon water
1 tablespoon olive oil
½ teaspoon salt

1 tablespoon butter
2 cobs of corn, kernels removed from cob
¾ cup frozen peas, thawed
1 teaspoon dried parsley
¼ cup grated Parmesan cheese

1 cup cream
¼ cup grated parmesan cheese
¼ cup basil, cut into chiffonade
¼ teaspoon pepper

Stir together the flour, semolina, egg yols, wine, water, oil and salt. If the dough doesn't come together, add a little more water, a teaspoon at a time. Form into a ball. Let rest for two hours. Roll the pasta per your pasta rollers instructions. Cut into 2 ½” squares.

In a largeskillet, heat the butter over medium heat. Add the corn, peas and herbs. Saute for 3 to 5 minutes, stirring often. Stir in the parmesan cheese.

Spoon 1 tablespoon of the corn and pea mixture onto half of the pasta squares. Brush the edges of each with water and lay a second square overtop, pressing to seal. Set aside.

In the same skillet, add the cream to any leftover corn and peas. Bring the cream to a simmer over medium heat, reduce heat to low. Stir in the Parmesan, basil and pepper.

Bring a large pot of salted water to a boil. Boil the raviolis for two minutes, drain and toss with the creamy basil sauce.
Pin It Now!

Thursday, July 2, 2015

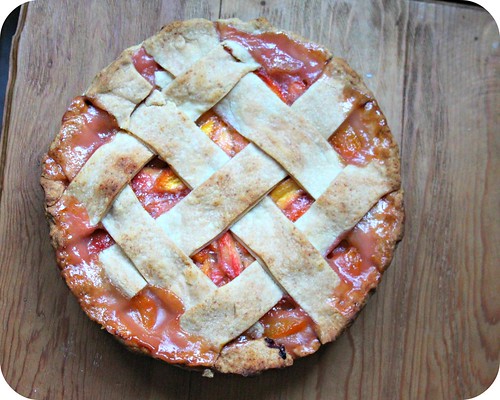
Texas Peach Pie

Texas :Peach Pie
The other day I realized I had never blogged a plain peach pie before. It's peach season here in Texas and we are tearing through huge bowl fulls of fresh peaches and nectarines. The biggest effort for this pie is peeling the peaches, which is made easier by blanching them first. The peach skin stained my wood cutting board a deep purplish blue, it was the oddest thing. It all came out in the wash though. Miss F has really taken to helping make pie crusts, she is a master food processor operator. Serve this pie with a big scoop of vanilla ice cream and you are ready for summer.  This recipe is adapted from both Martha Stewart and Food & Wine.
Texas Peach Pie

2 ½ cups flour
1 tablespoon sugar
1 teaspoon salt
1 cup cold butter
3 to 4 tablespoons ice water

8 large, ripe but firm peaches (3 ½ pounds)
¾ cup sugar
1 ½ tablespoons fresh lemon juice
¼ cup plus 1 tablespoon flour
1 ½ tablespoons butter, thinly sliced

Pulse flour, sugar and salt in a food processor until combined. Add butter and process until mixture resembles coarse meal, about 10 seconds. With the machine running, add ice water in a slow steady stream until mixture just begins to hold together.

Shape dough into a disk, wrap in plastic and refrigerate 1 hour or up to 3 days, before using. When ready, roll out ¾ of the dough into a 10” circle. Press the dough into a 9” pie pan and put it in the refrigerator. Place the remaining dough back into the refrigerator, wrapped in plastic wrap.

Preheat the oven to 400 degrees. Bring a large pan of water to a boil and make a large bowl of ice water. Score an “X” into the bottom of each of the peaches. Boil each peach for a minute, then put straight into the bowl of ice water. Peel the peaches, then slice into wedges.

In a large bowl, stir together the peaches, sugar, lemon juice and flour. Pour the peaches into the refrigerated pie crust and top with the sliced butter. Roll out the remaining dough into six 1 ½“ strips, weave the strips overtop of the pie and crimp the edges.

Place the pie on a cookie sheet and bake for 30 minutes. Reduce the oven temperature to 375 degrees and cover the edges of the pie with foil, bake for 40 minutes more. Transfer the pie to a wire rack and cool. Serve with vanilla ice cream.
Pin It Now!
Related Posts Plugin for WordPress, Blogger...